7. Proxy (Squid)¶
NTPSense includes Squid, a high-performance HTTP/HTTPS caching proxy, as an optional package. Once installed, it lets you cache frequently-accessed content, enforce category-based content filtering, and block specific domains manually — all managed from the Web UI, no manual config file editing required.
This guide walks through installing Squid, configuring blocklists, adding manual blacklist entries, and a few important operational notes that aren't obvious from the UI alone.
1. Prerequisites¶
- NTPSense CE or Pro, logged in as an administrator
- Squid is not installed by default — it's added on demand via Package Manager
2. Installing Squid¶
- Go to Package Manager in the sidebar.
- Under the Available tab, find Squid and click Install.
- A live console popup shows installation progress in real time. Wait for it to report success, then close the popup.
- The Proxy menu item now appears in the sidebar.
Note: Squid is installed directly from the official FreeBSD package repository — no separate license or account is required.
3. General Settings¶
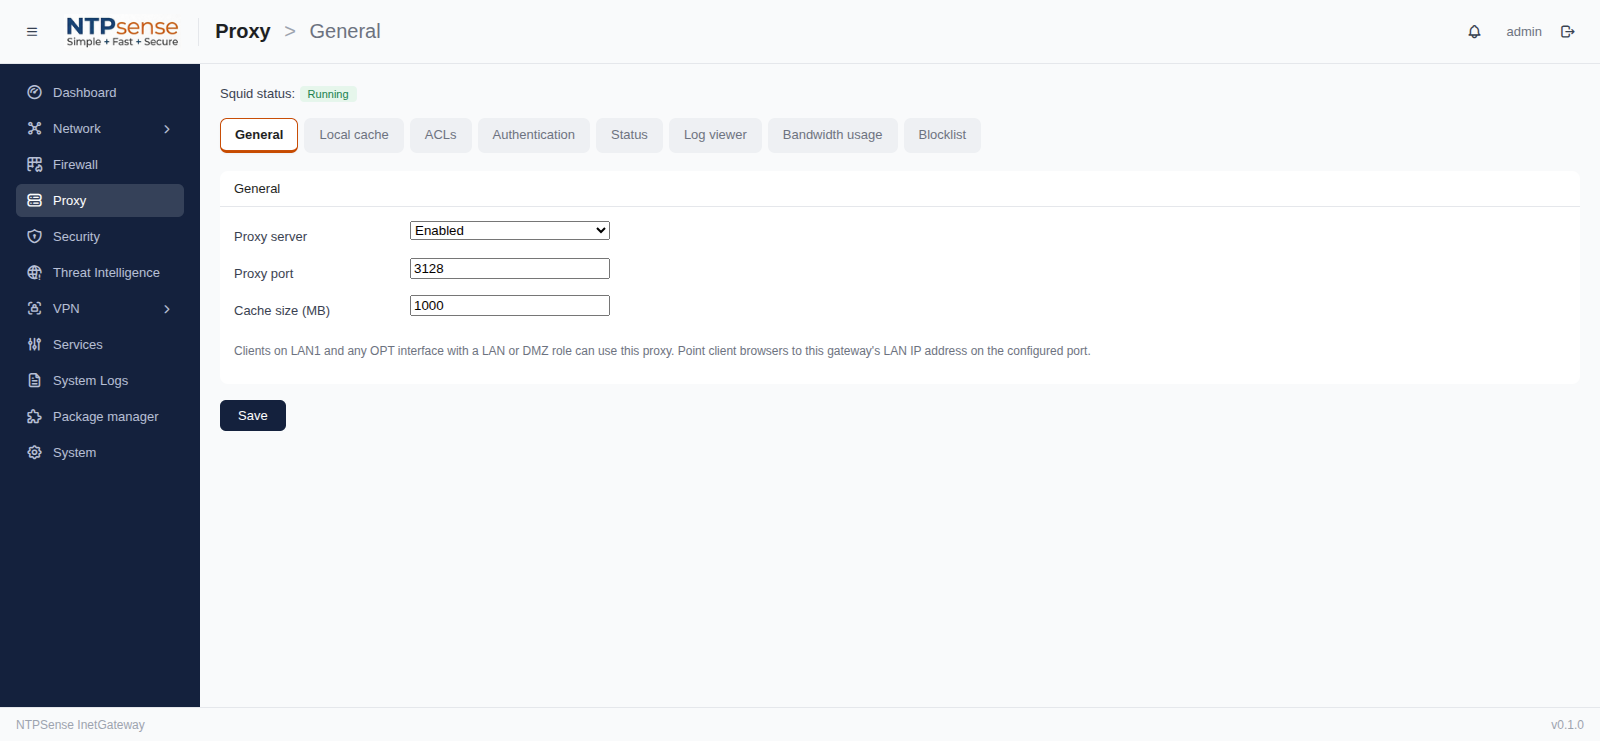
Open Proxy > General.
- Enable Squid — toggles the proxy service on/off.
- Cache size — how much disk space Squid may use for cached content (configured under Local Cache).
Click Save & Apply after any change here. This restarts the Squid service to pick up the new settings.
 Proxy General
4. Category Blocklists¶
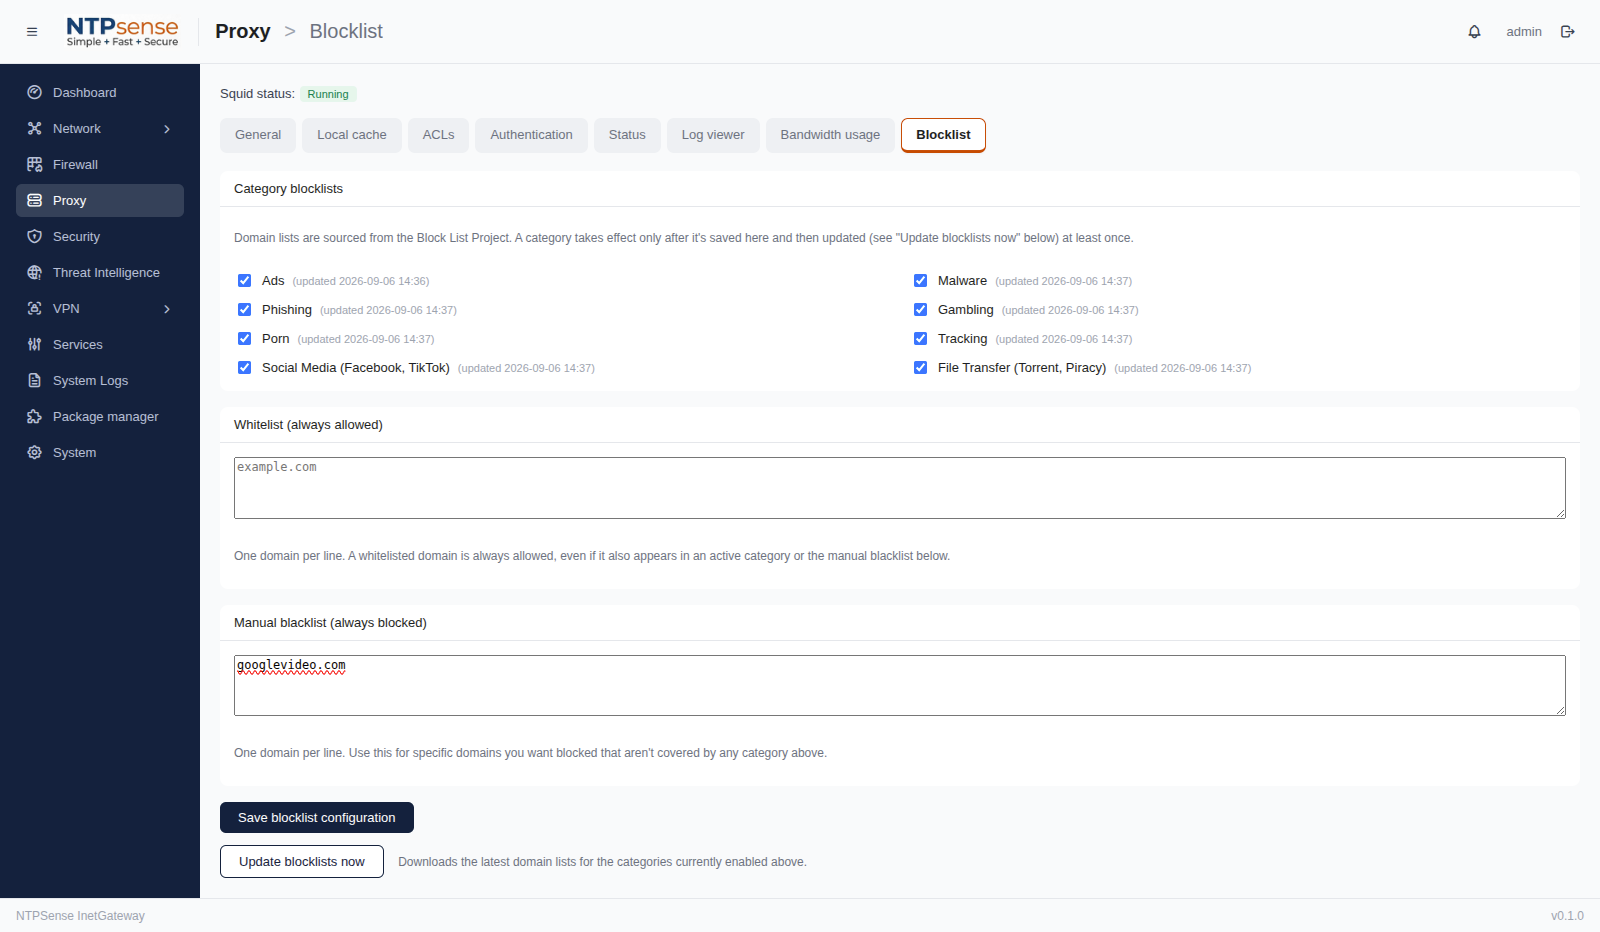
Open Proxy > Blocklist.
NTPSense ships with 8 pre-built category blocklists (ads, malware, phishing, gambling, porn, tracking, social media, file transfer), sourced from the Block List Project and updated automatically every day at 03:00.
- Toggle on the categories you want to enforce (e.g. Malware, Phishing are recommended for every deployment).
- Click Save & Apply.
You can check Status and Log Viewer tabs to confirm the lists downloaded successfully and see how many domains are currently blocked per category.
 Proxy Blocklist
5. Manual Blacklist (Blocking Specific Domains)¶
Use this when you need to block a specific domain that isn't covered by the category lists — for example, a specific site your organization wants blocked regardless of category.
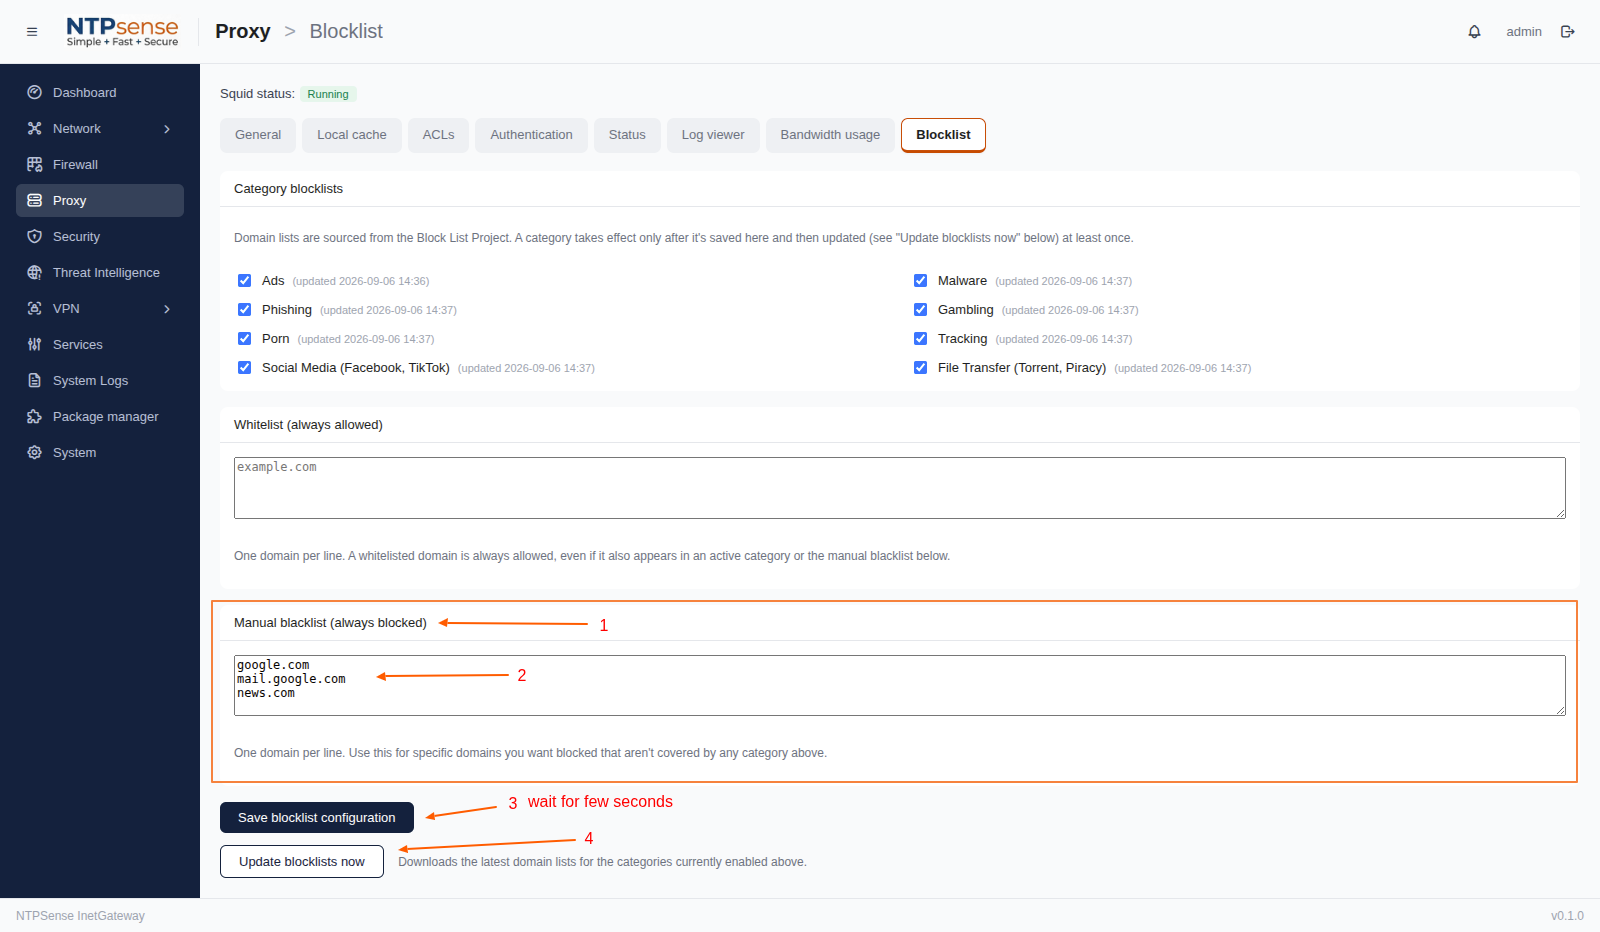
- Open Proxy > Basic Authentication (or the Manual Blacklist section, depending on your version) and locate the blacklist entry field.
- Enter the domain you want to block (e.g.
google.com). Adding a domain automatically blocks its subdomains as well (e.g.mail.google.com,www.news.com). - Click Save Blocklist Configuration.
 Manual Blacklist
⚠️ Important — two-step process: Clicking Save Configuration alone stores the new blacklist entry, but does not immediately apply it to the running Squid service. You must also click the Update button afterward for the block to take effect. If you only click Save and test right away, the domain will still be reachable — this is expected behavior, not a bug. Always click Save Configuration, then Update, in that order, before testing.
- To verify, try browsing to the blocked domain from a client device on your LAN. It should now fail to load.
6. Understanding ACLs — Avoid Accidentally Bypassing Your Blocklists¶
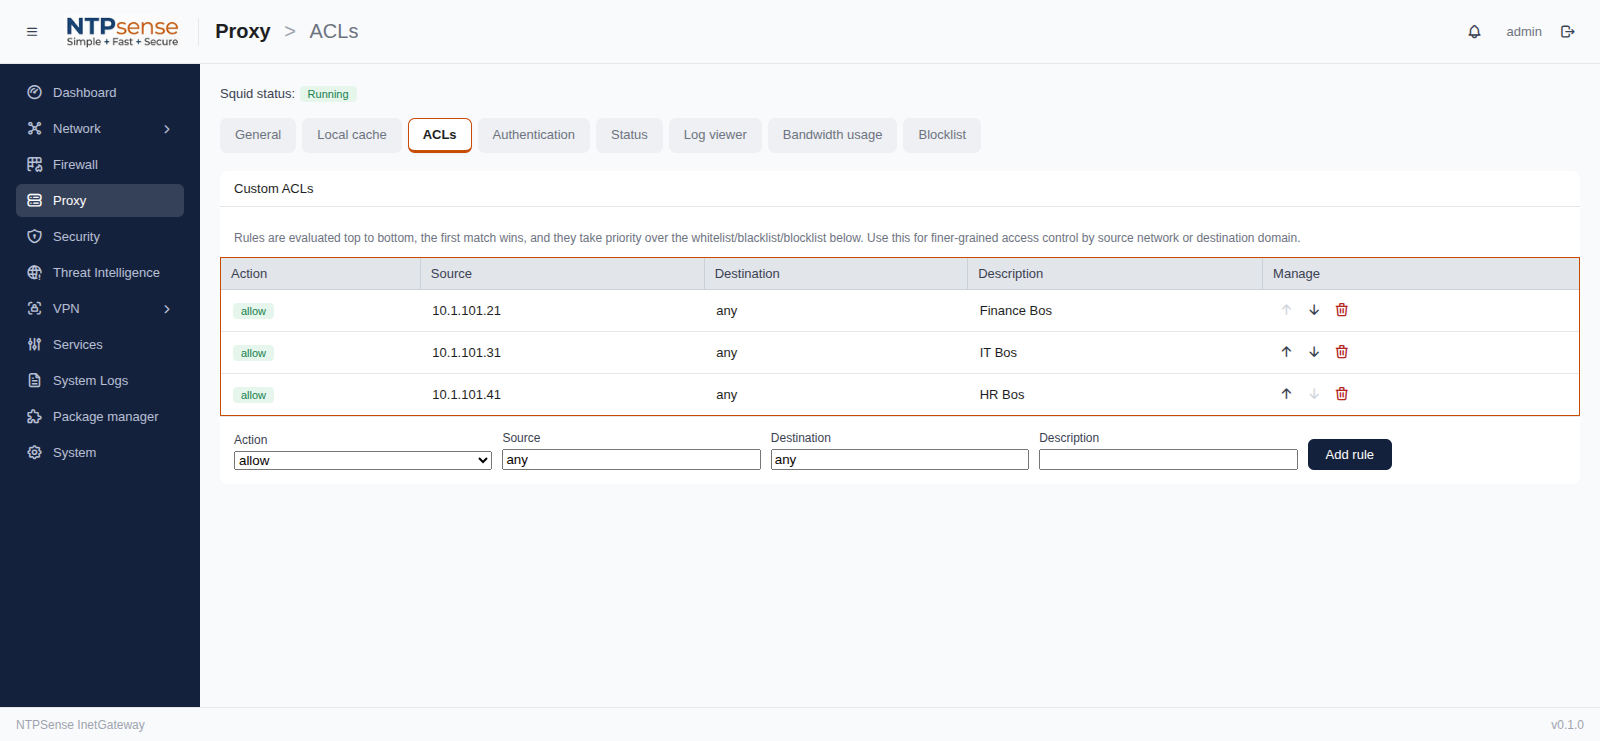
Open Proxy > ACLs if you need to allow specific exceptions (e.g., a particular device or subnet that should have different access rules than the rest of your network).
 Proxy ACLs
⚠️ Common pitfall: ACL rules of type Allow are evaluated before your blacklist and category blocklists. This is intentional — it lets you create genuine exceptions (e.g., "allow this one device to bypass filtering"). However, if you create an Allow rule whose source range covers your entire LAN subnet (the same range already covered by the default "allow local network" rule), it will silently bypass all blocking — manual blacklist and category blocklists alike — for every device on your network.
If you only want your LAN to be able to use the proxy at all (not bypass filtering), you don't need to add anything here — this is already handled automatically. Only add an Allow ACL here when you genuinely need a narrow, specific exception (a single IP or a small sub-range), not your whole network.
7. Verifying Everything Works¶
After completing sections 4–6:
- From a client device on your LAN, try browsing to a domain you added to the manual blacklist. It should be blocked.
- Try browsing to a domain known to be in one of your enabled categories (e.g. a known ad-serving domain). It should also be blocked.
- Try browsing to an unrelated, non-blocked site. It should load normally.
If a domain you expect to be blocked is still reachable, check, in order: - Did you click Update after Save Configuration (§5)? - Do you have an overly broad Allow ACL rule that might be matching first (§6)? - Is the domain served over HTTPS? (See the limitation note below.)
8. A Known Limitation: Custom Block Pages for HTTPS Sites¶
When a plain HTTP site is blocked, Squid can show a custom block page. However, for HTTPS sites (the vast majority of the web today), the browser itself displays its own generic connection error (e.g. "The proxy server is refusing connections") — Squid cannot inject a custom message at this stage, because the block happens before any page content can be sent over the encrypted connection.
Showing a custom branded block page for HTTPS sites would require SSL Bump (full TLS interception), which requires deploying a custom certificate authority to every client device on your network. This has significant privacy and management implications and is not enabled by default in NTPSense.
If your users see a generic "proxy server is refusing connections" error, this is expected — it confirms the site is genuinely blocked by policy, not a network problem.
Summary Checklist¶
- [ ] Squid installed via Package Manager
- [ ] General settings saved and Squid enabled
- [ ] Desired blocklist categories enabled
- [ ] Manual blacklist domains added, Save Configuration and Update both clicked
- [ ] No overly-broad Allow ACLs accidentally bypassing filtering
- [ ] Blocking verified from a client device