NTPSense CE User Manual
Everything you need to install, configure, and administer NTPSense InetGateway CE.
1. Getting Started
1.1 What is NTPSense CE?
NTPSense InetGateway Community Edition (CE) is a free, open-source network gateway appliance built on FreeBSD. It combines a firewall, DHCP server, VPN, and web proxy into a single self-installing system, managed through a web interface or a console menu.
This manual covers CE as installed from the official ISO available at ntpsense.com/download.html.
1.2 What You'll Need
| Field | Description |
|---|---|
| Hardware | Any x86-64 (amd64) machine with at least 2 wired Ethernet ports — one for LAN, one for WAN. A mini-PC, an old desktop, or a VM all work. |
| Memory | 4 GB RAM minimum. More is recommended if you plan to enable the IDS/IPS (Suricata) or proxy features. |
| Disk | 20 GB or larger. The installer uses the entire disk, so make sure nothing important is on it. |
| USB drive | 2 GB or larger, to write the installer ISO to (unless installing into a VM, where the ISO can be mounted directly). |
1.3 Downloading and Writing the Installer
- Go to ntpsense.com/download.html and download the ISO file (the checksum file next to it lets you verify the download afterward, if you'd like).
- Write the ISO to your USB drive. On Linux or macOS, this is typically done with the
ddcommand; on Windows, tools like Rufus or balenaEtcher work well. - If you're installing into a virtual machine instead, you can usually mount the ISO directly as a virtual CD-ROM — no USB drive needed.
Note: The full command for writing the ISO with dd, along with the exact download link, is available on the download page itself.
1.4 Installing NTPSense CE
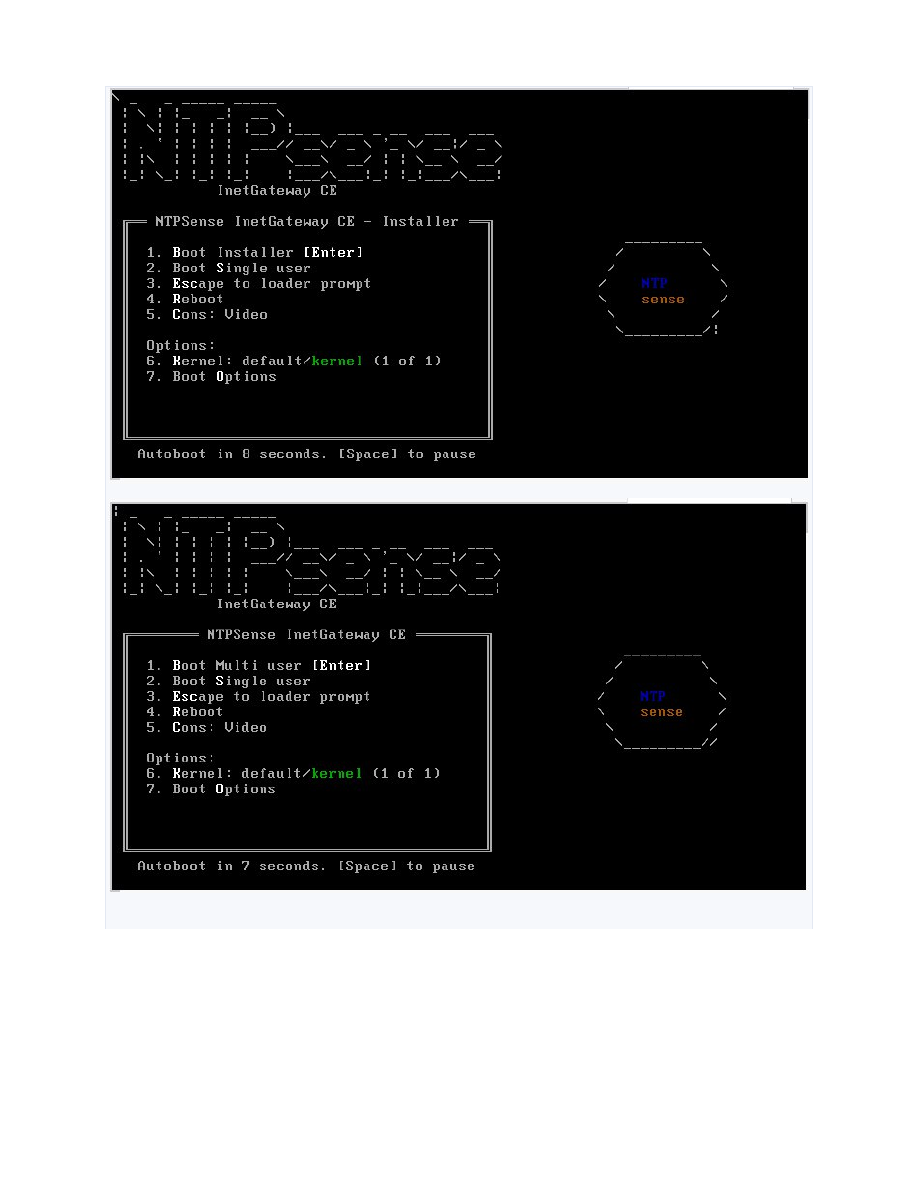
Installation is fully automated — once you boot from the ISO, there are no prompts to answer.
- Connect the machine's two network ports: one to your existing internet connection (this becomes WAN), and one that will become your new LAN.
- Boot the machine from the USB drive (or the mounted ISO, if using a VM).
- Wait. The installer partitions the disk, installs the base system, and configures the gateway — all without any input from you.
- The machine reboots automatically once installation finishes.
Warning: The installer erases the entire disk it's installed to. Double-check you're booting the right machine before starting, especially if it has other data on it.
1.5 First Login
Once installation completes and the gateway has rebooted, connect a computer to the LAN port.
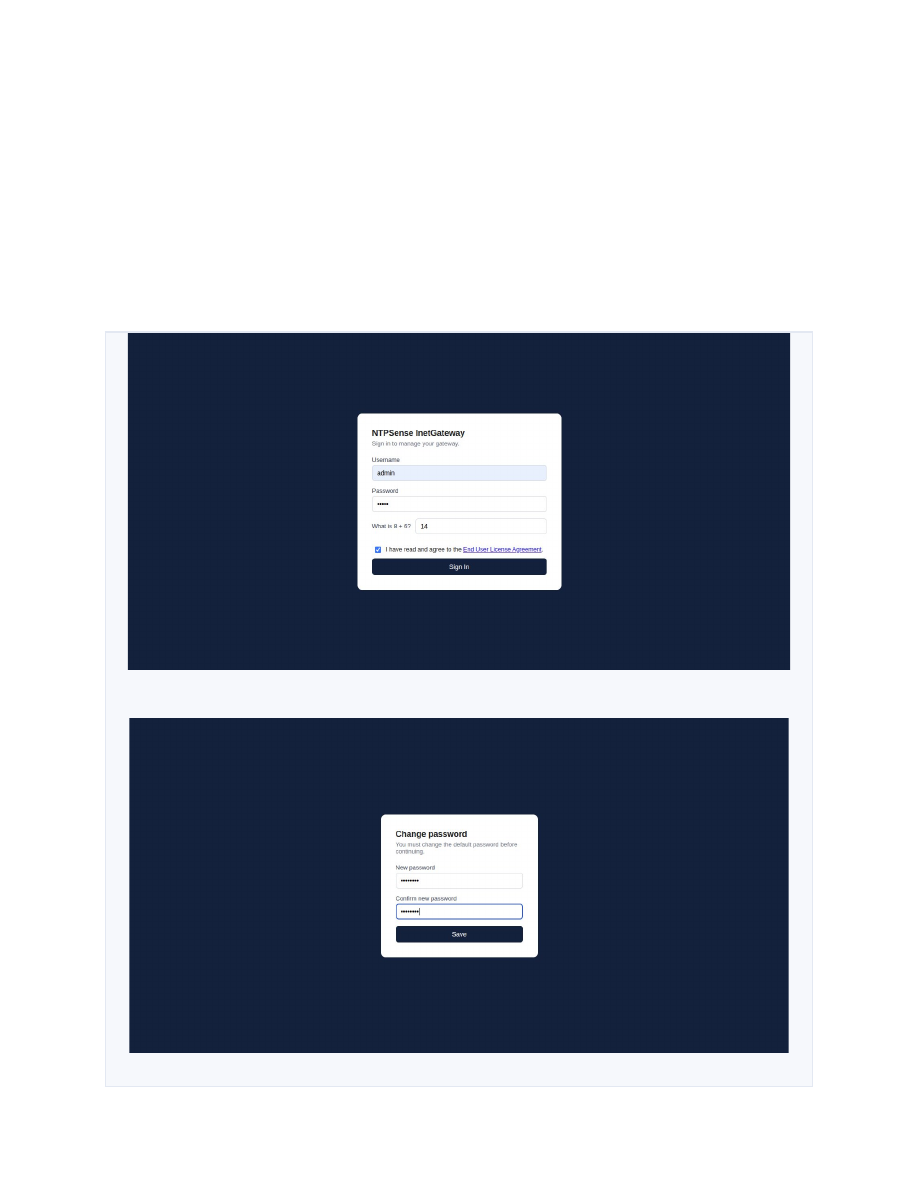
- Open a web browser and go to
https://10.252.1.100/(or whichever address your specific installer variant uses — this is shown briefly on the console during first boot). - Your browser will warn you about a self-signed certificate. This is expected — click through to proceed.
- Log in with the default credentials: username
admin, passwordadmin. - You'll be required to change this password immediately. Choose something you'll remember — there's no "forgot password" link for a device you administer directly.
1.6 Reading and Accepting the License Agreement
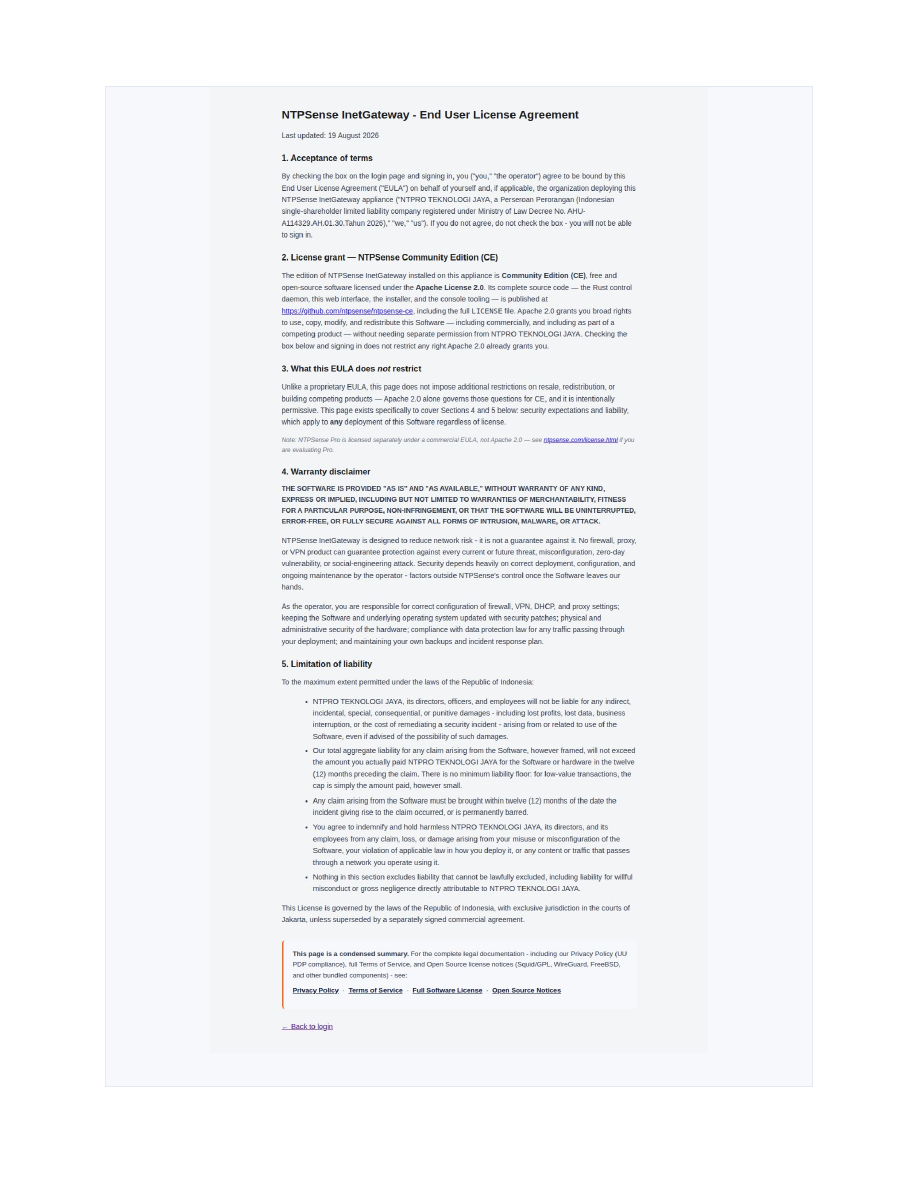
Before you can sign in, you'll be asked to check a box confirming you've read the End User License Agreement (EULA). NTPSense CE is licensed under the Apache License 2.0 — a permissive open-source license that lets you use, modify, and redistribute the software freely, including commercially.
1.7 Console Access (Optional)
Alongside the web interface, NTPSense CE includes a full administration menu accessible over SSH or a direct serial/keyboard connection. Log in with the same admin account and password — the console menu will show only the options your account's role permits.
Note: Console access uses the same role-based permissions as the web interface. An Administrator account sees the full menu; more restricted roles (Network Operator, Auditor) see a filtered subset.
2. Dashboard
2.1 Overview
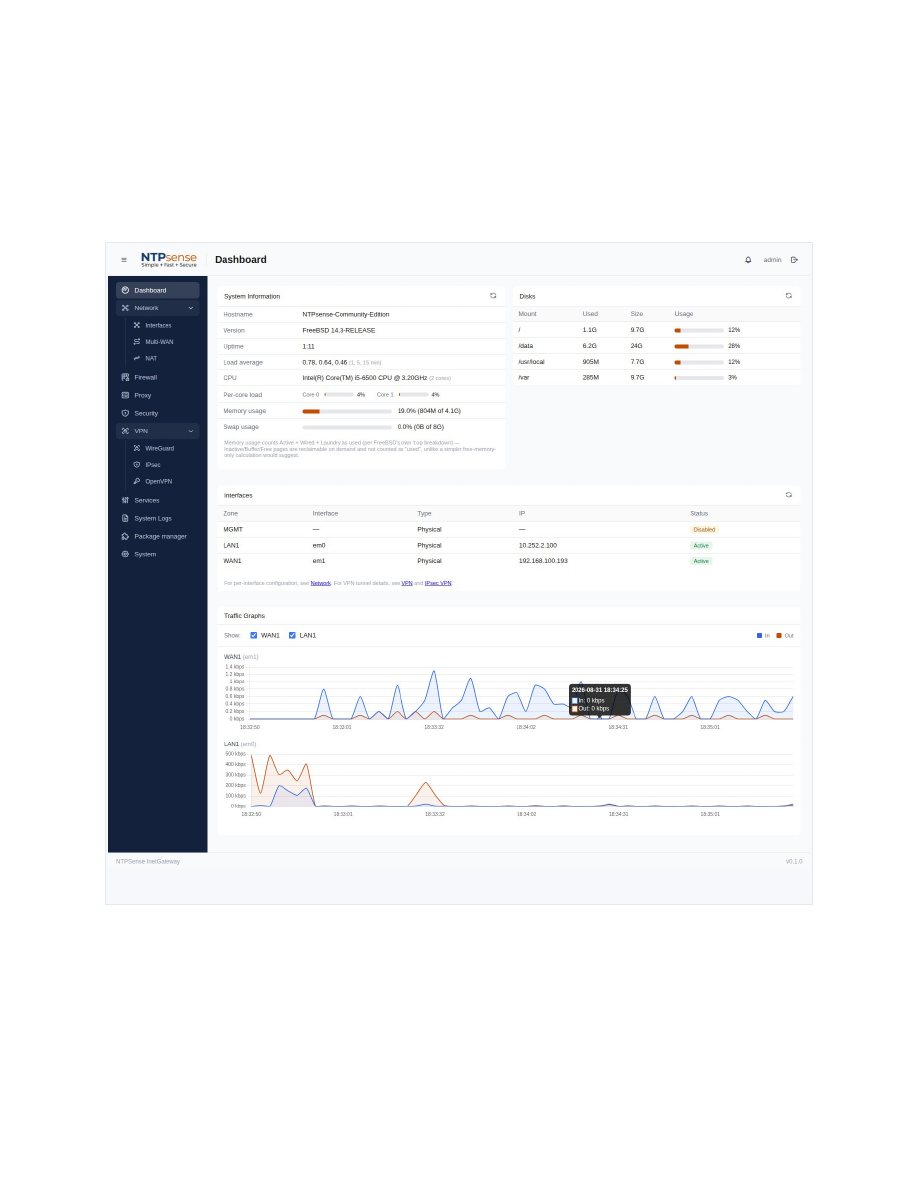
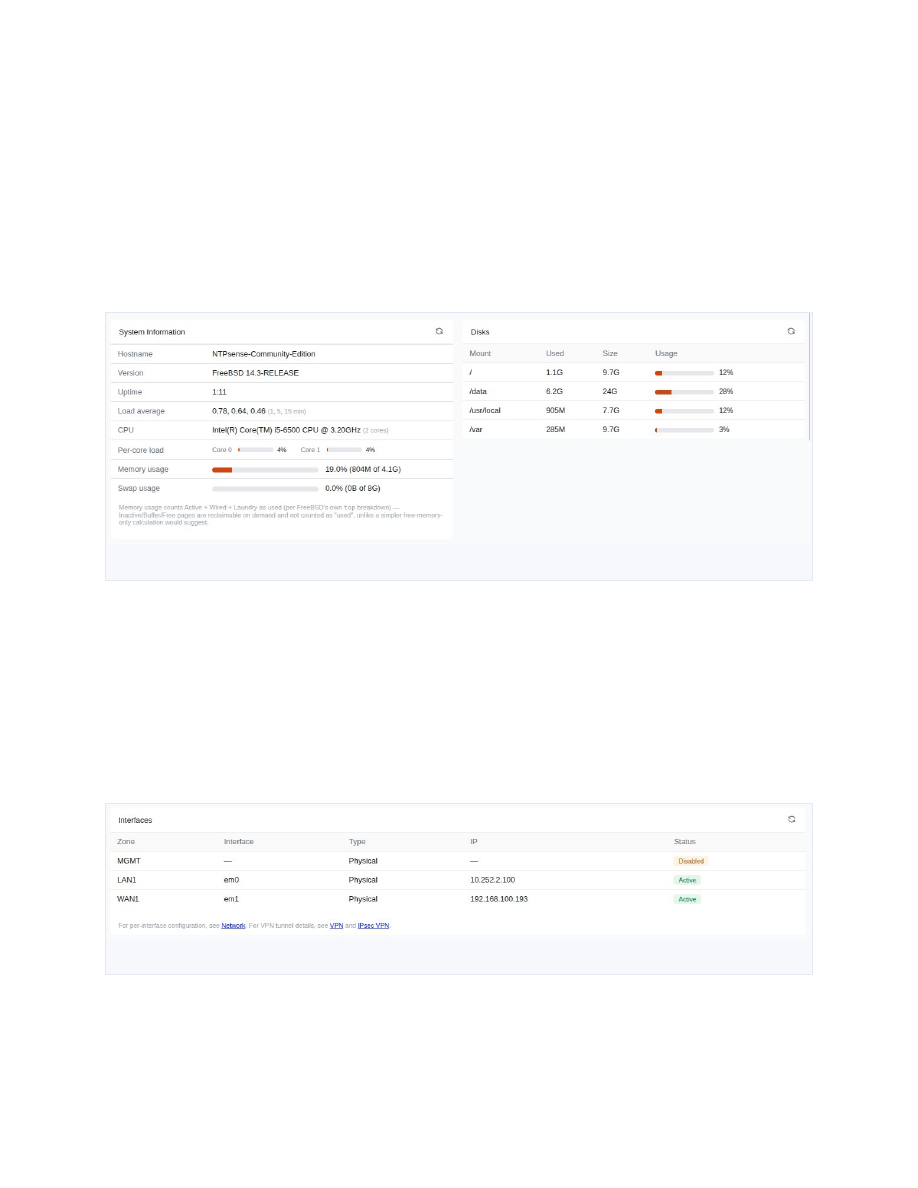
The Dashboard is the first page you see after logging in — an at-a-glance view of the gateway's health: system resources, network status, and basic identification.
2.2 System Resources
The dashboard shows live CPU, memory, swap, and disk usage, refreshed automatically.
- CPU — shown per core (not just an aggregate number), along with the detected CPU model and core count.
- Memory — RAM currently in use versus total installed.
- Swap — how much swap space is active and how much is currently used.
- Disk — usage per partition (root, /var, /usr/local, and /data).
2.3 System Identity
A summary panel shows the gateway's hostname, NTPSense version, FreeBSD version, and uptime.
2.4 Network Summary
A quick-glance table lists each configured interface, its assigned IP address, and whether it's currently up or down.
3. Network
3.1 Overview
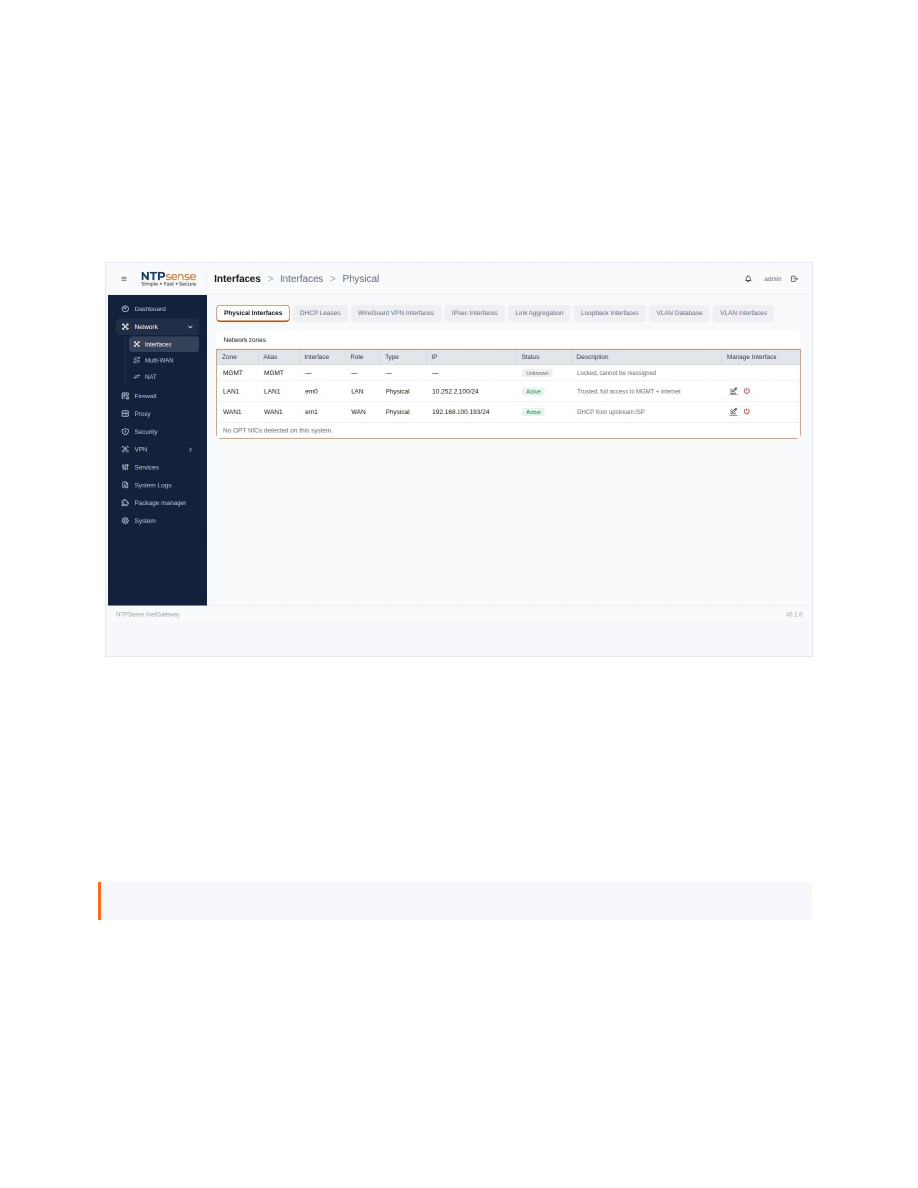
The Network page configures the gateway's physical interfaces — assigning IP addresses, defining zones, and setting each interface's role. On standard 2-NIC hardware, LAN1 handles both regular client traffic and administrative access, following the same convention pfSense and OPNsense use for minimal hardware.
3.2 Understanding Zones
- LAN1 — your internal network. Devices here can reach the internet and, by default, the Web UI/console.
- WAN1 — your internet-facing connection, typically DHCP unless you have a fixed IP.
- Additional zones (DMZ, guest networks) can be added on hardware with more than two NICs, or via VLANs.
Note: On 2-NIC hardware, an anti-lockout rule is always active on LAN1 — you cannot accidentally firewall yourself out of the Web UI from the LAN side.
3.3 Configuring an Interface
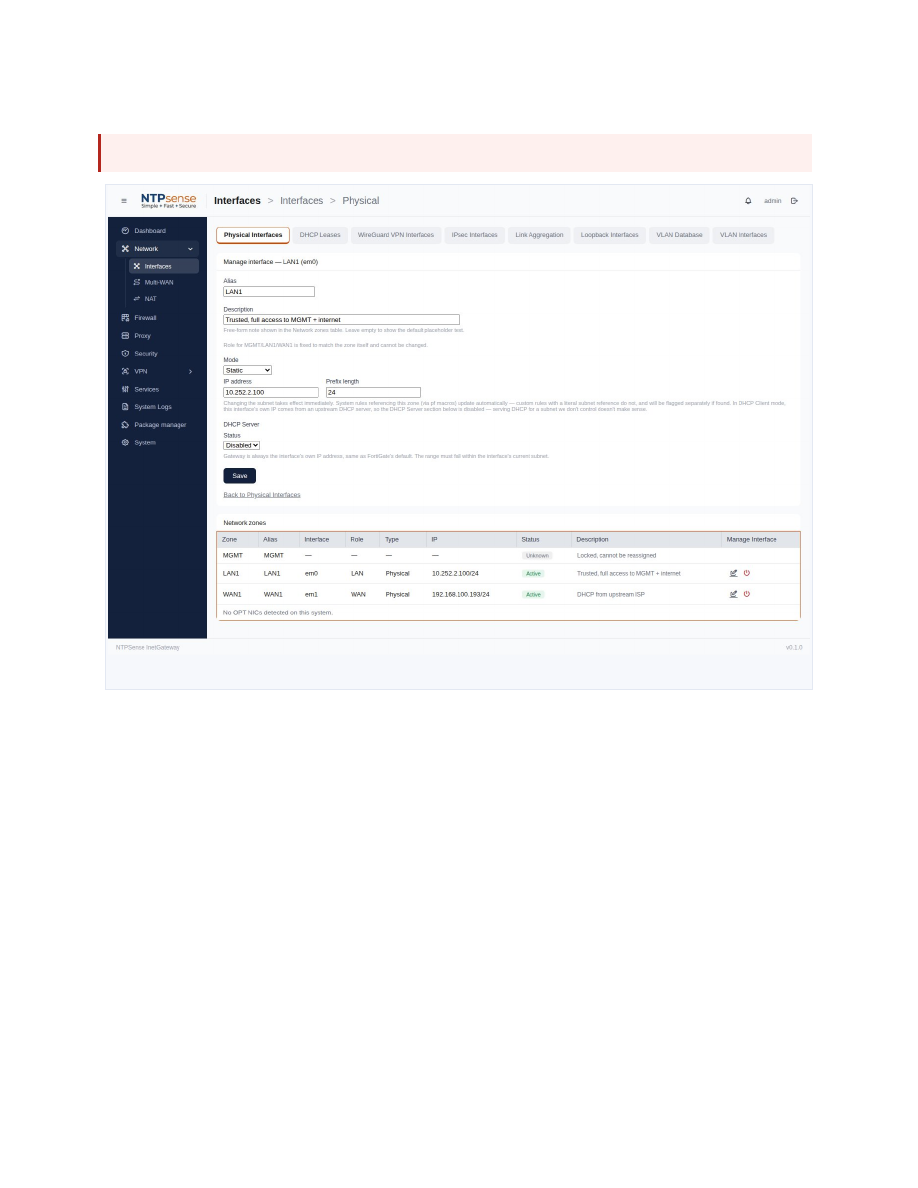
- Open the Network page and select the interface you want to configure.
- Choose Static or DHCP.
- If Static, enter the IP address and subnet (CIDR notation, e.g.
10.252.1.100/24). - Save. The change applies immediately.
Warning: Changing LAN1's IP while connected through that same interface will disconnect your current session.
3.4 Interface Roles
Each interface shows a Role — MGMT, LAN, WAN, DMZ, or Undefined — used elsewhere in the system (e.g. to populate the list of eligible WAN interfaces on the Security page).
3.5 Interface Status
A status badge shows one of four states: Disabled, Down (no link detected), Active, or Unknown.
4. Firewall
4.1 Overview
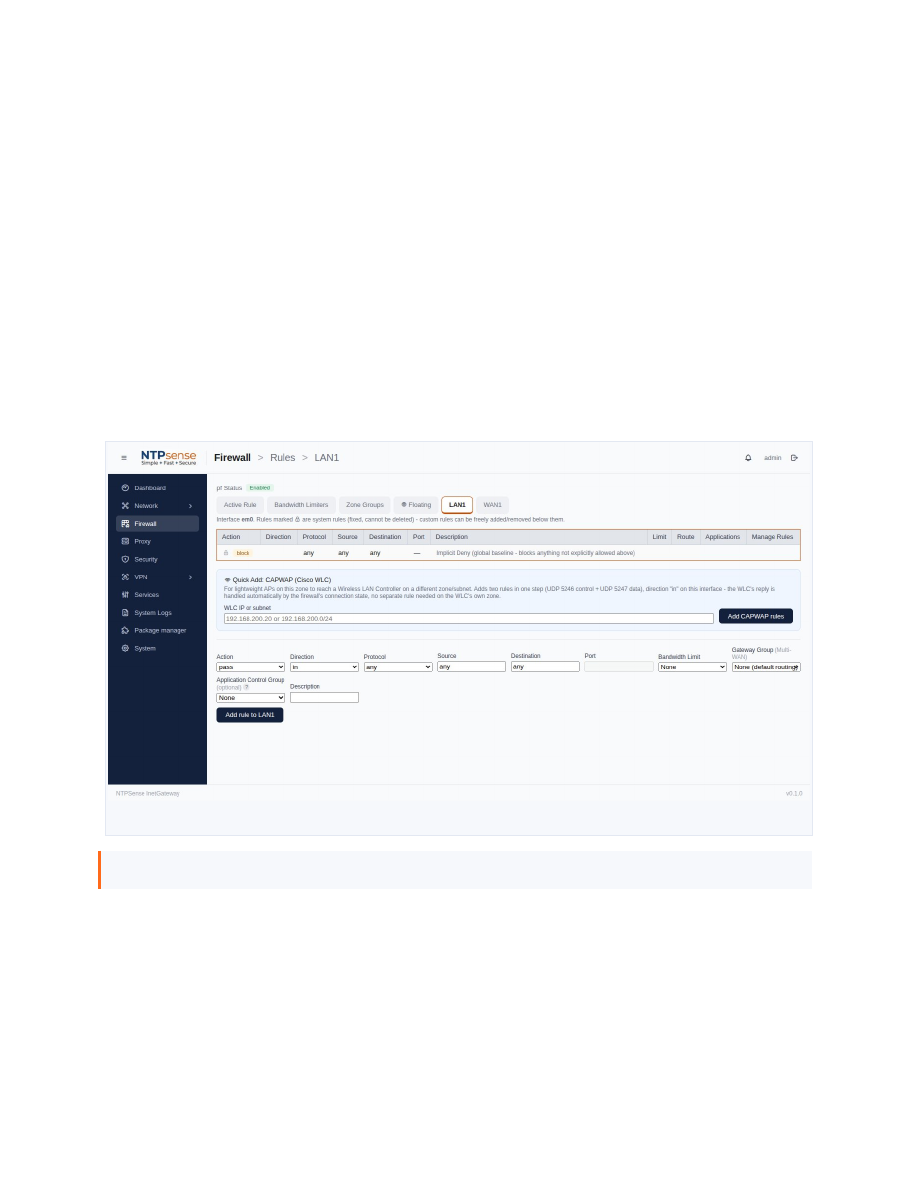
NTPSense CE's firewall is built directly on FreeBSD's pf (Packet Filter) — the same engine used by pfSense and OPNsense. Rules are evaluated top to bottom per interface: the first rule that matches a packet decides its fate.
4.2 Custom Rules
- Go to Firewall and select the interface (or Floating, for a rule not tied to one interface).
- Click Add Rule.
- Set the action, source, destination, and port/protocol as needed.
- Save. The rule takes effect immediately.
Note: Rules are evaluated in the order shown in the table. If traffic isn't behaving as expected, check whether an earlier rule already matched it first.
4.3 Reordering Rules
Use the up/down controls next to each rule to change its position in the evaluation order.
4.4 NAT and Port Forwarding
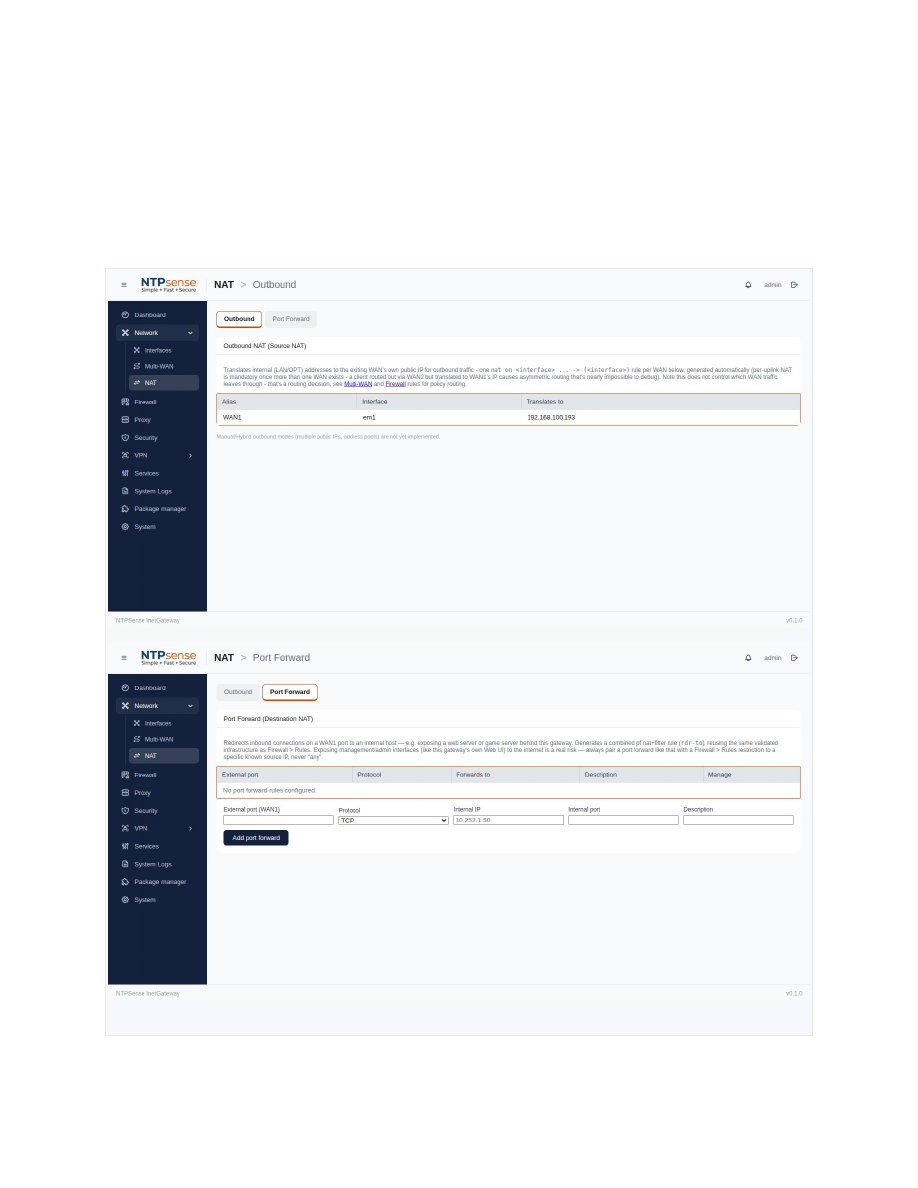
The NAT page lets you forward a port from WAN1 to a specific internal device.
- Go to NAT and click Add.
- Enter the WAN port, the internal IP to forward to, and the internal port.
- Save. A matching firewall rule is created automatically.
5. DHCP
5.1 Overview
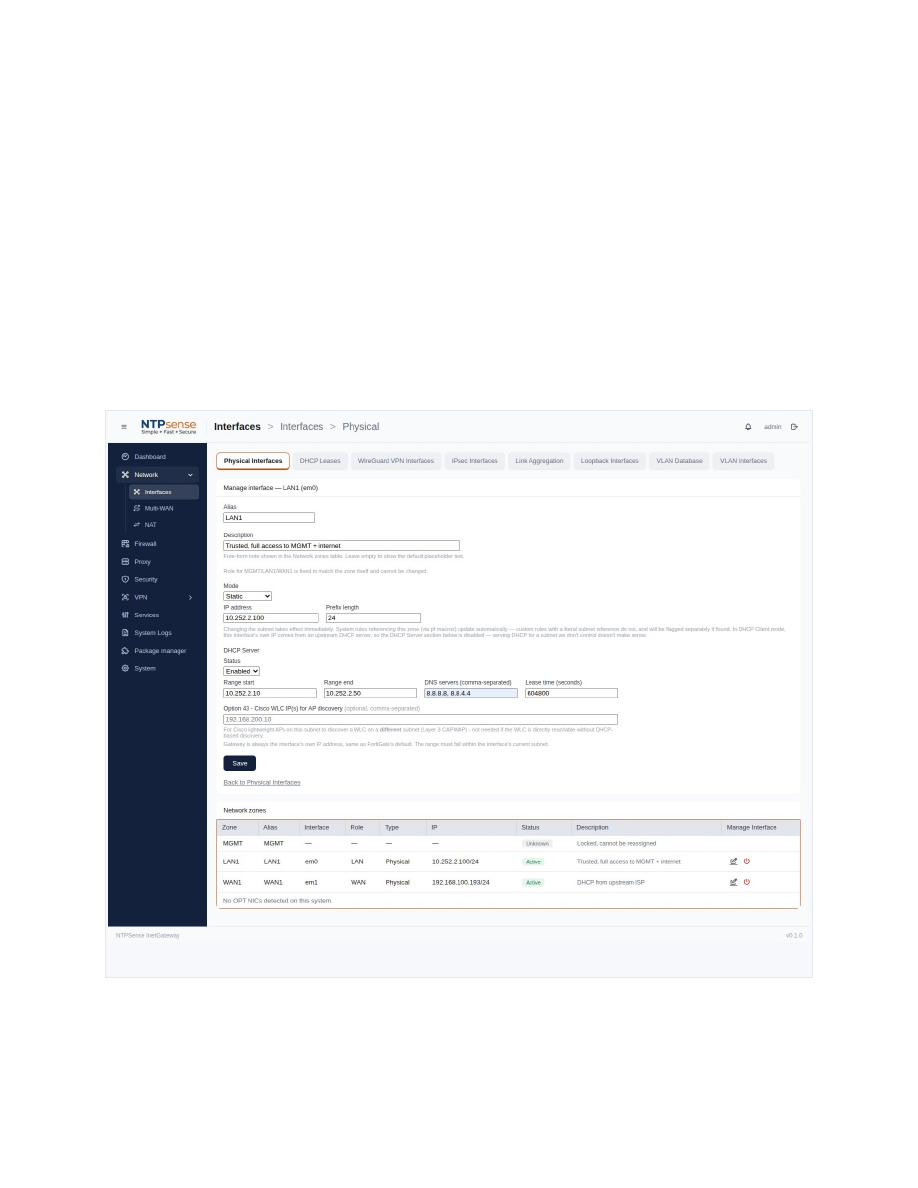
NTPSense CE uses Kea DHCP (the modern successor to ISC DHCP) to assign IP addresses automatically. Configuration lives on the Network page, alongside interface settings.
5.2 Configuring a DHCP Scope
- Select the interface you want to serve DHCP on (typically LAN1).
- Enable DHCP and set the address range.
- Set the DNS server(s) to hand out (leave blank to use the gateway itself).
- Save.
5.3 DHCP Leases
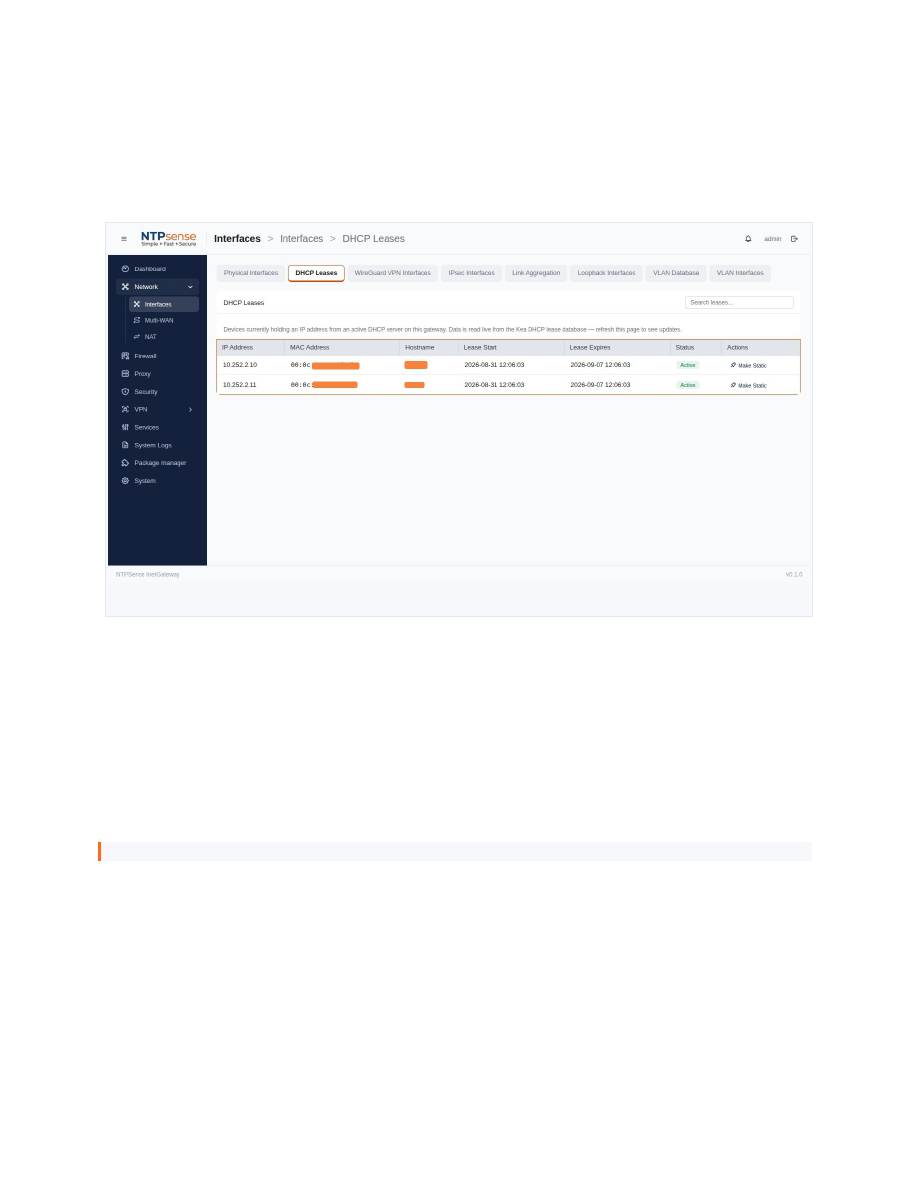
The DHCP Leases tab shows every device currently holding an address: IP, MAC, hostname, lease start, and expiry — read live from Kea's own database.
5.4 Static Reservations
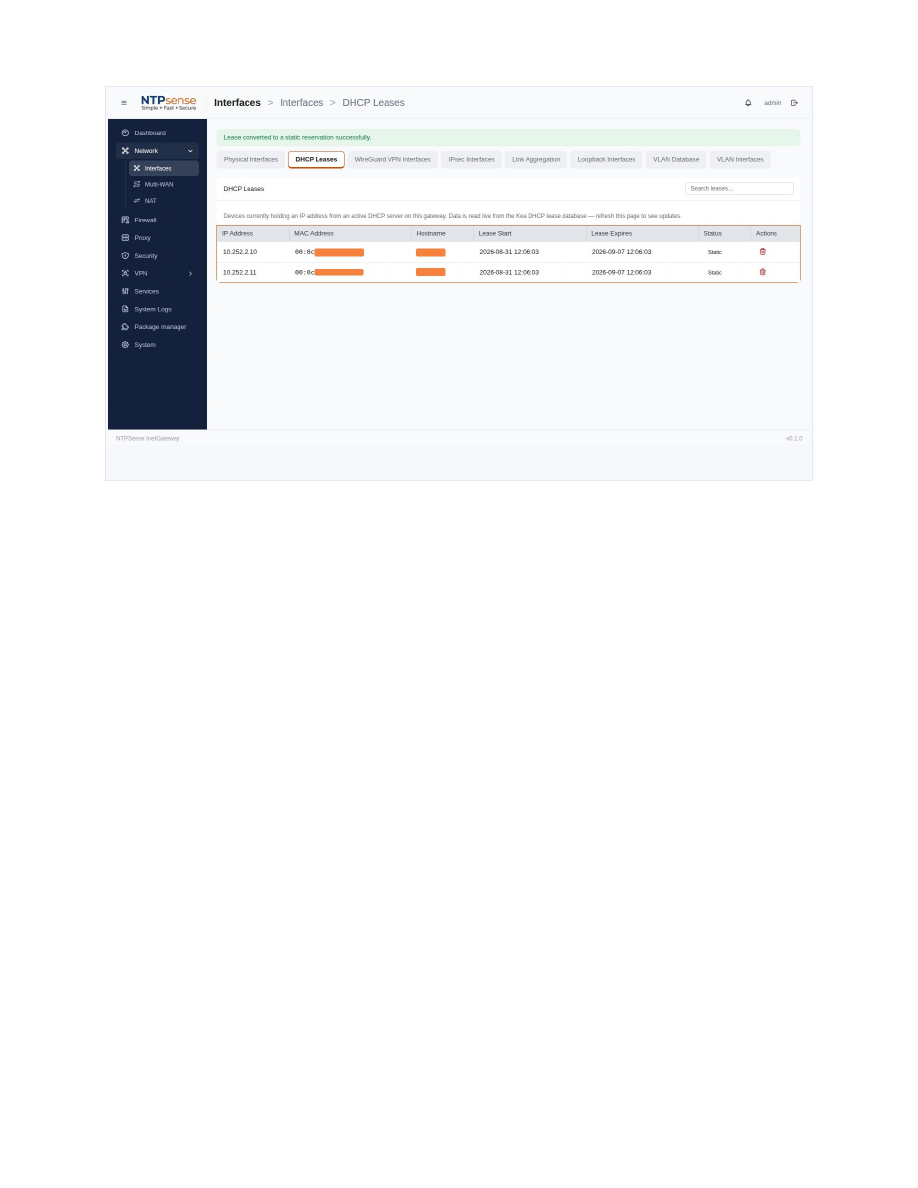
Convert any active lease into a permanent reservation directly from the Leases tab — no need to know the device's MAC address ahead of time.
- Find the device in the DHCP Leases table.
- Click Make Static next to its entry.
- The device's status changes to Static and it keeps this address indefinitely.
Note: A static reservation can be removed the same way, returning the address to the dynamic pool.
6. Proxy
6.1 Overview
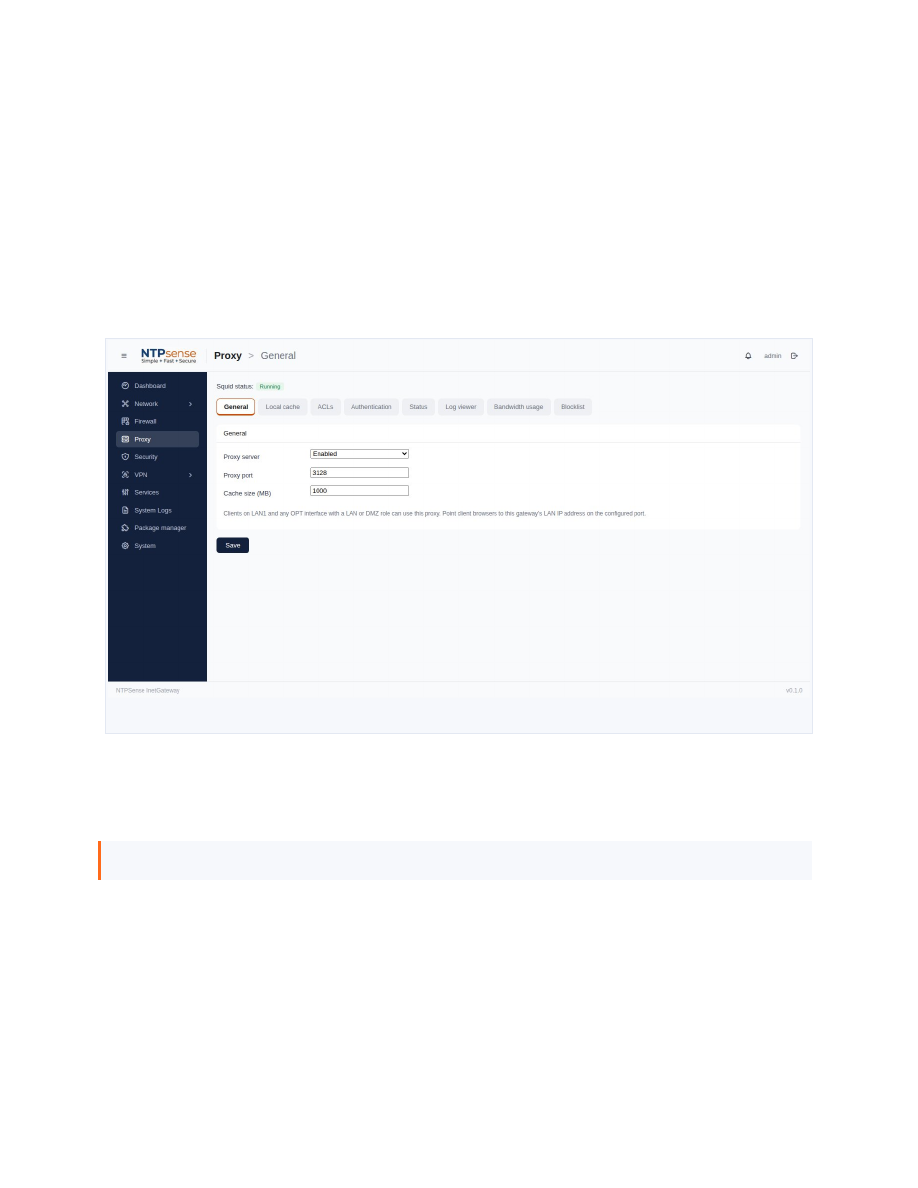
NTPSense CE includes Squid, a caching web proxy, for content filtering and bandwidth control. This is entirely optional.
6.2 General Settings
Enable the proxy and choose Transparent mode (no client configuration needed) or Explicit mode (client devices must be configured to use the gateway as their proxy).
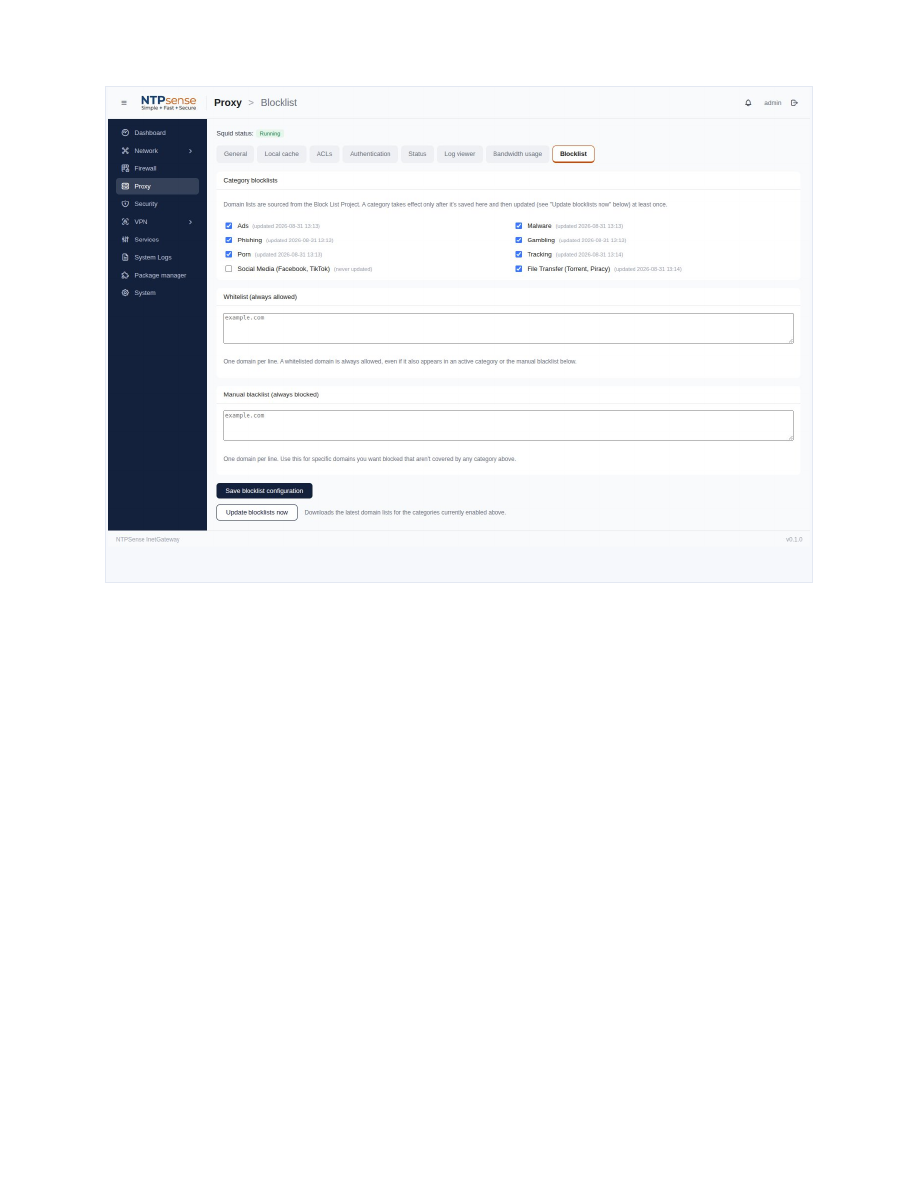
6.3 Blocklist Categories
Content categories (Ads, Malware, Phishing, Gambling, Adult Content, Social Media, and others) are sourced from the Block List Project and can be toggled independently.
Note: A "Fake News" category is intentionally not offered — categorizing news sources as legitimate or not is an editorial judgment this project does not make on your behalf.
6.4 Whitelist and Blacklist
- Whitelist — domains here are never blocked, even if covered by an enabled category.
- Blacklist — domains here are always blocked, checked before category lists.
6.5 Basic Authentication
Require a username and password before a device can use the proxy — separate from Web UI login accounts.
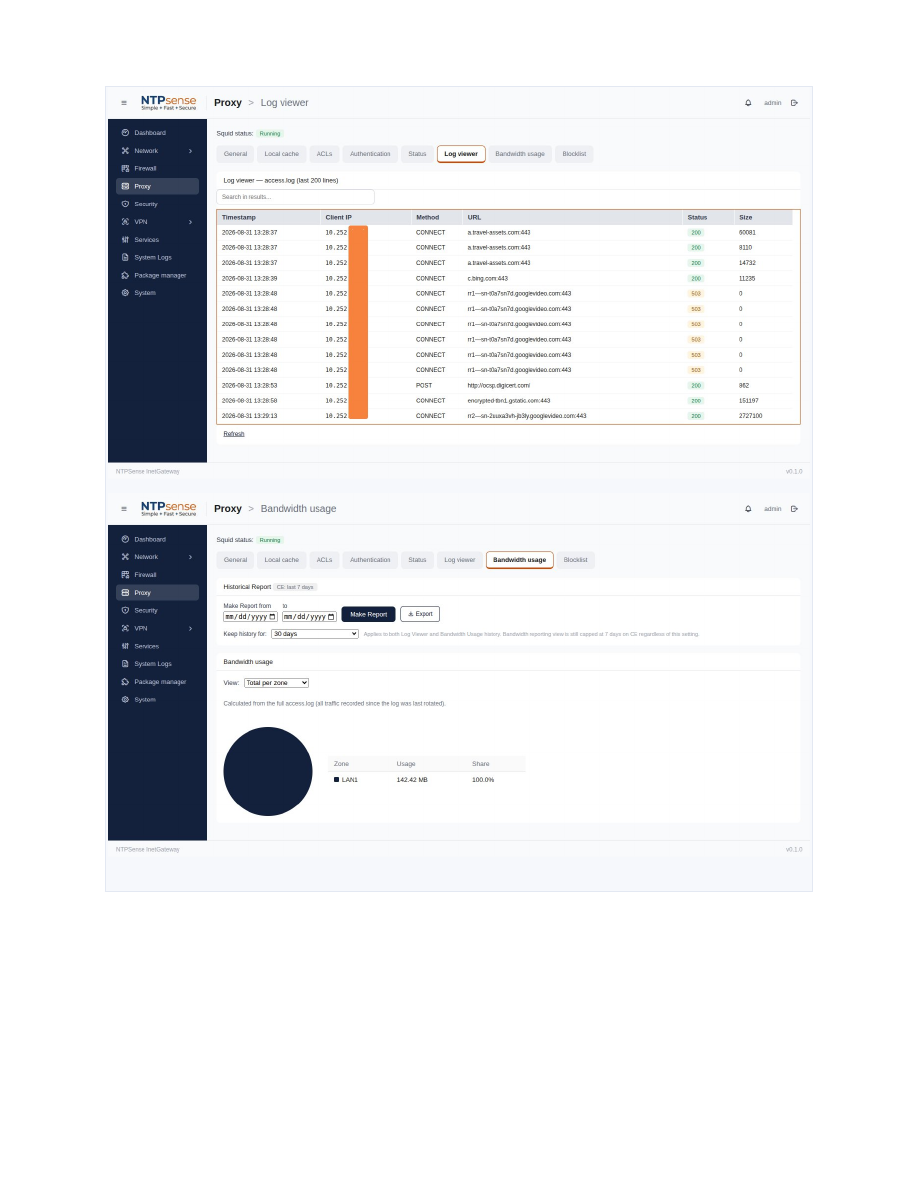
6.6 Log Viewer and Bandwidth Usage
See recent proxy activity and per-client data usage.
7. Security (IDS/IPS)
7.1 Overview
The Security page controls Suricata, an intrusion detection and prevention engine, inspecting traffic against a continuously-updated set of threat signatures.
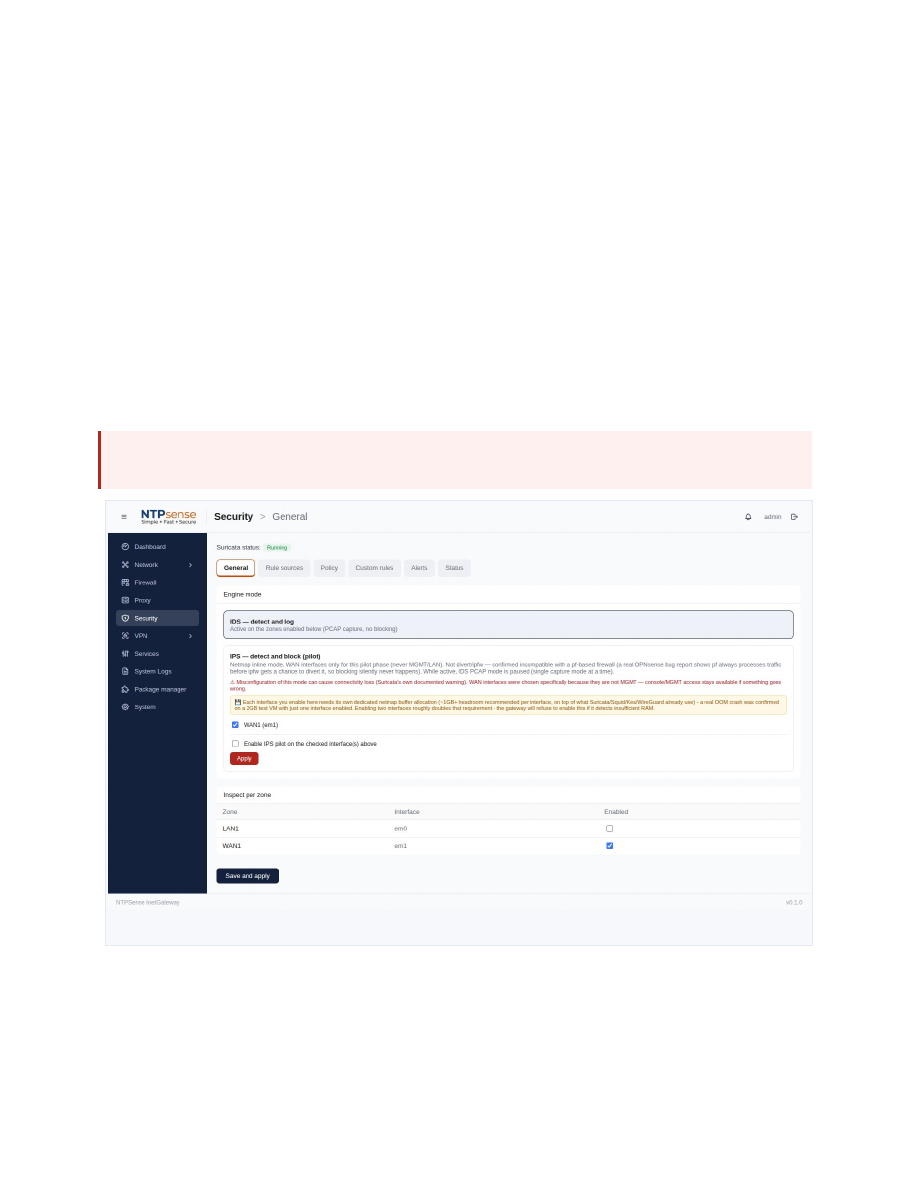
7.2 Engine Mode: IDS vs. IPS
- IDS (detect and log) — the safer default, no risk of disrupting connectivity.
- IPS pilot (detect and block) — active inline on WAN interfaces only, never LAN or the management path.
Warning: Enabling IPS pilot mode requires roughly 1 GB or more of free RAM per interface. The gateway refuses to enable it if it detects insufficient memory.
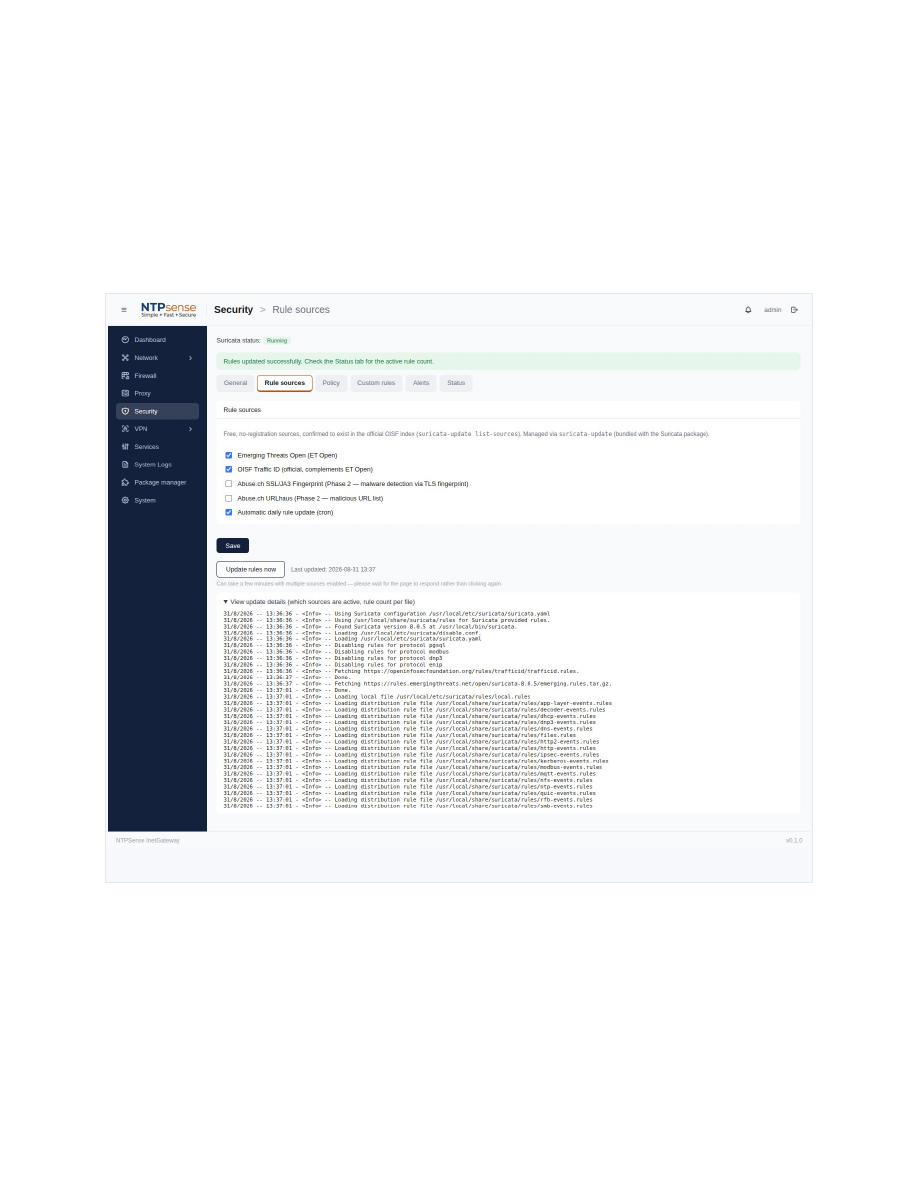
7.3 Rule Sources
Detection signatures come from ET Open, OISF Traffic ID (default), and optionally Abuse.ch SSL/JA3 + URLhaus.
7.4 Policy
Disable noisy rule categories (chat apps, online games, etc.) — takes effect after the next rule update.
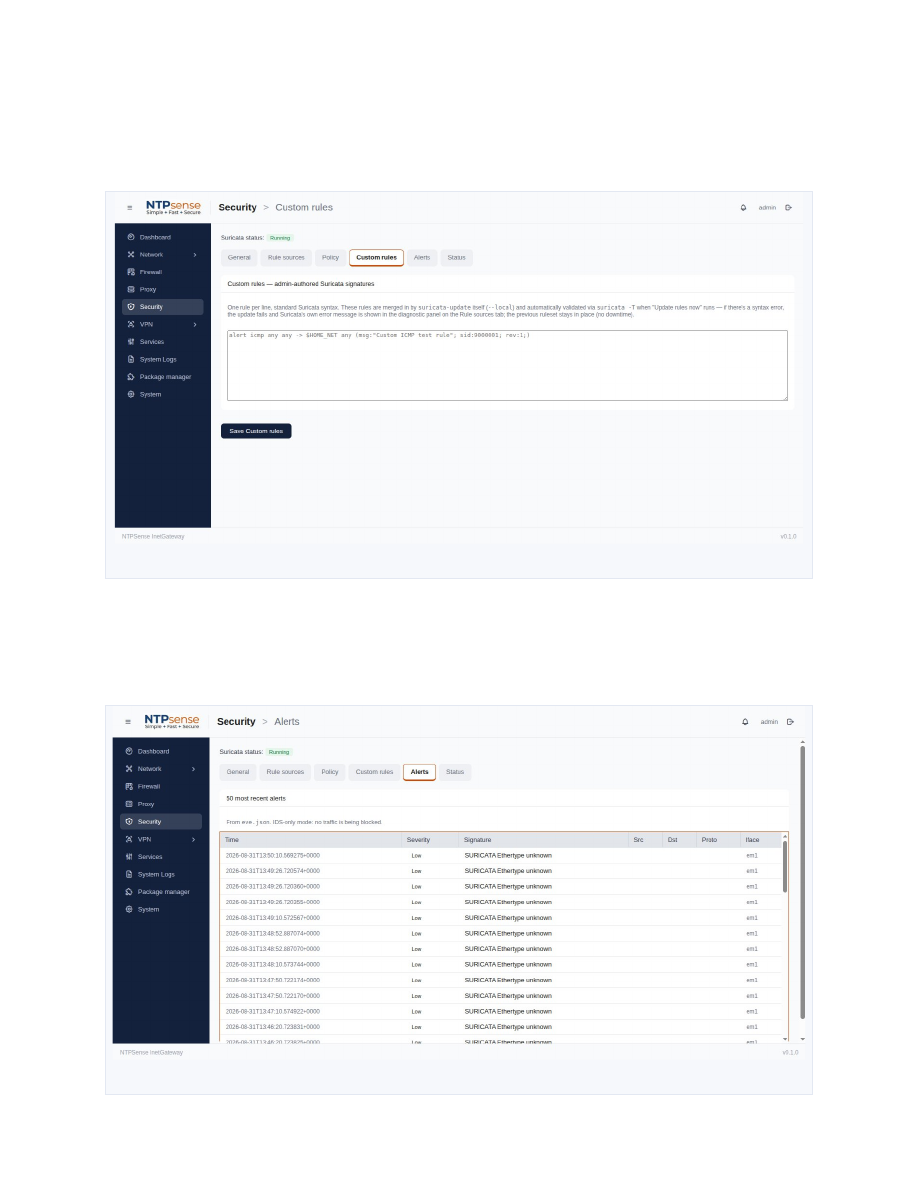
7.5 Custom Rules
Add your own Suricata signatures directly. Rules are validated automatically — a syntax error keeps the previous working ruleset active rather than taking detection offline.
7.6 Alerts
The 50 most recent detections: timestamp, severity, matched signature, and source/destination.
8. VPN
8.1 Overview
- WireGuard — fast, modern, ideal for personal remote access.
- OpenVPN — certificate-based, works over TCP/443, blends in through strict firewalls.
- IPsec — industry-standard site-to-site tunnels.
8.2 WireGuard
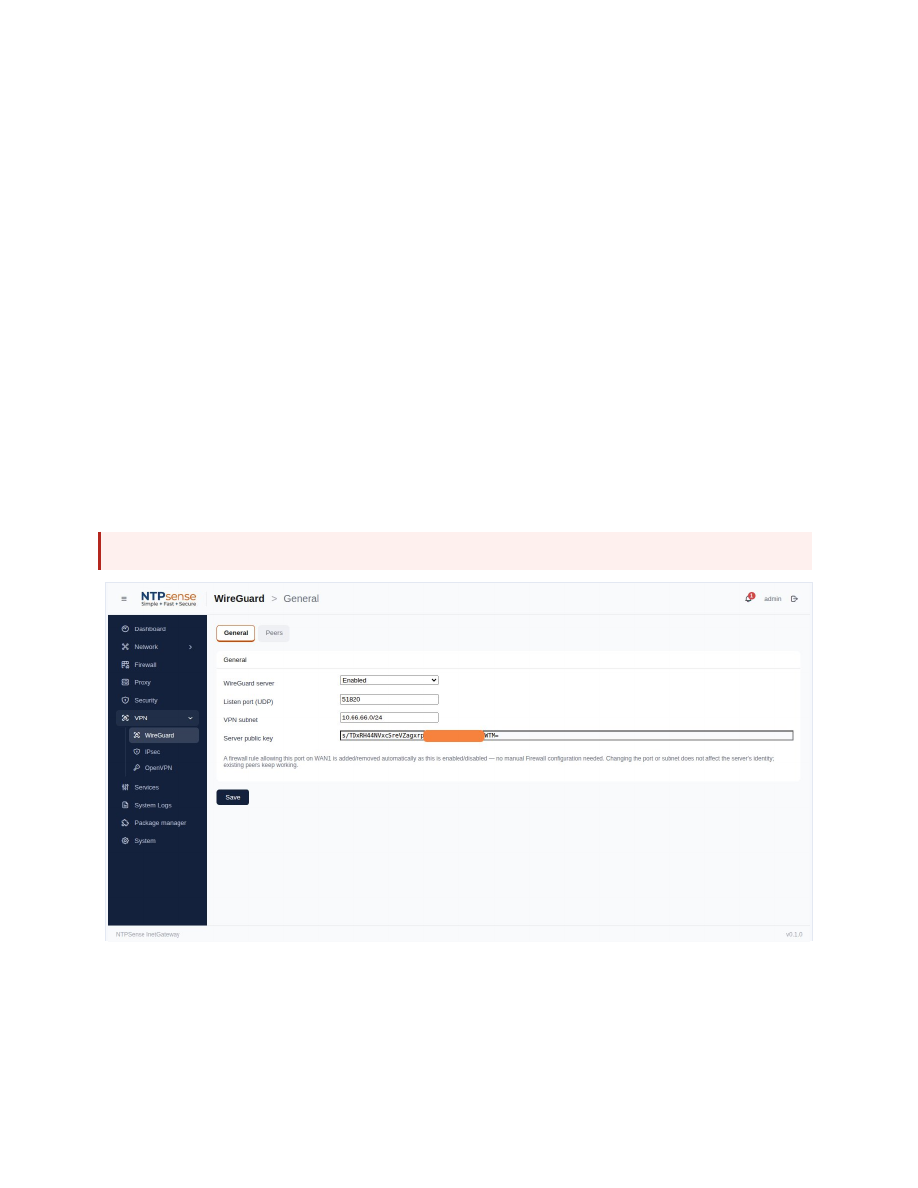
- Enable it, choosing a listen port and an internal VPN subnet.
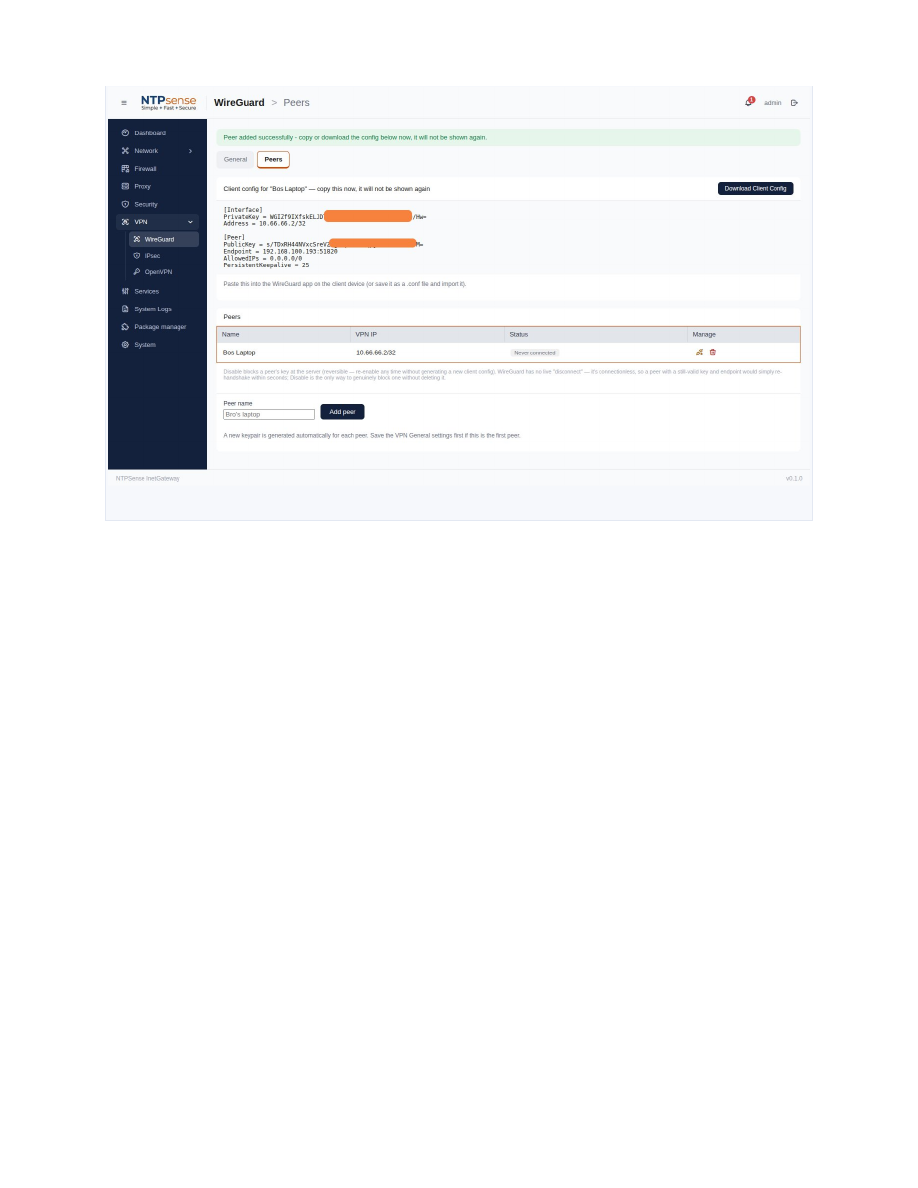
- Go to Peers and click Add Peer.
- Copy or download the generated client configuration — shown only once.
- Import it into the WireGuard app on the connecting device.
Warning: A peer's configuration (including its private key) cannot be retrieved again after creation. If lost, delete the peer and create a new one.
8.3 OpenVPN
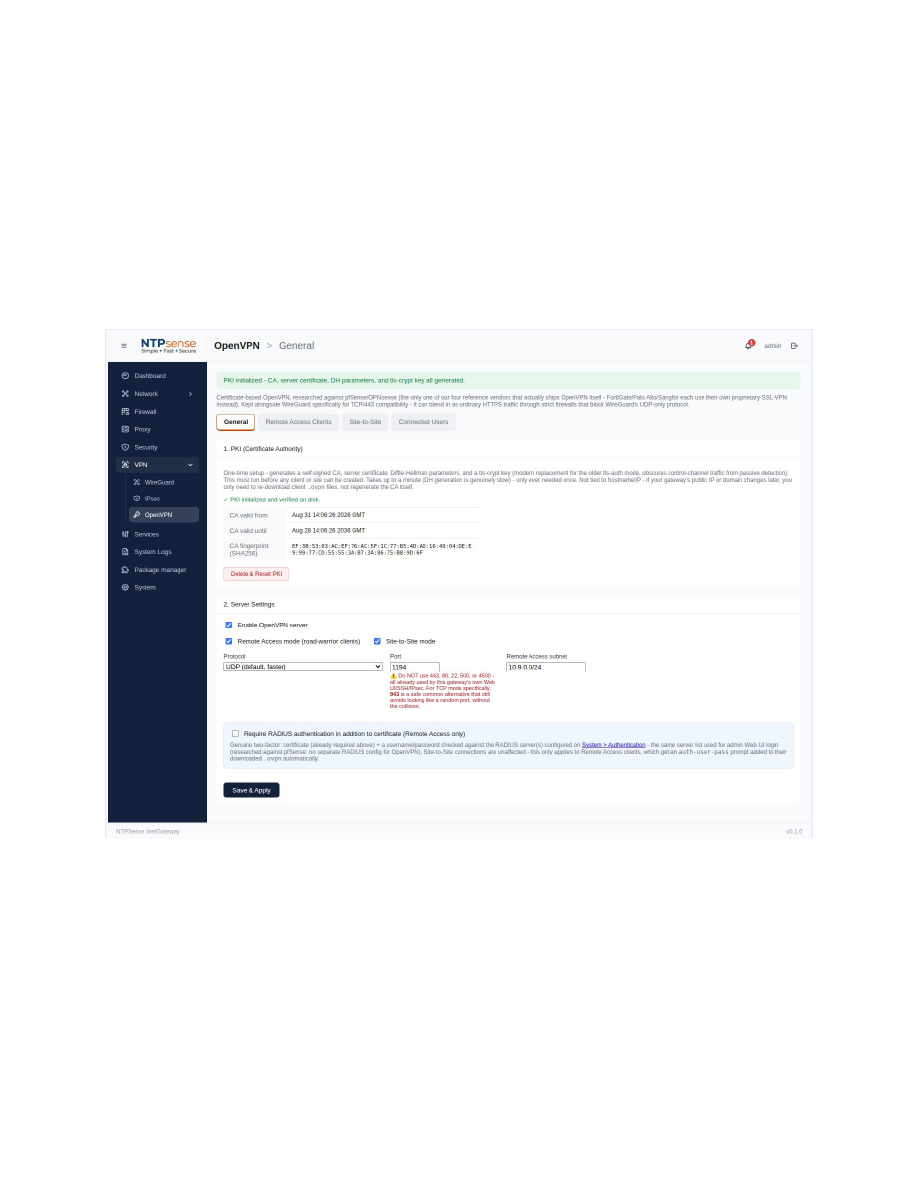
Requires a one-time PKI setup before any client or site can be created.
- Initialize the PKI (can take up to a minute).
- Add a Remote Access Client and download its .ovpn profile.
- Import into the OpenVPN client app.
8.4 IPsec
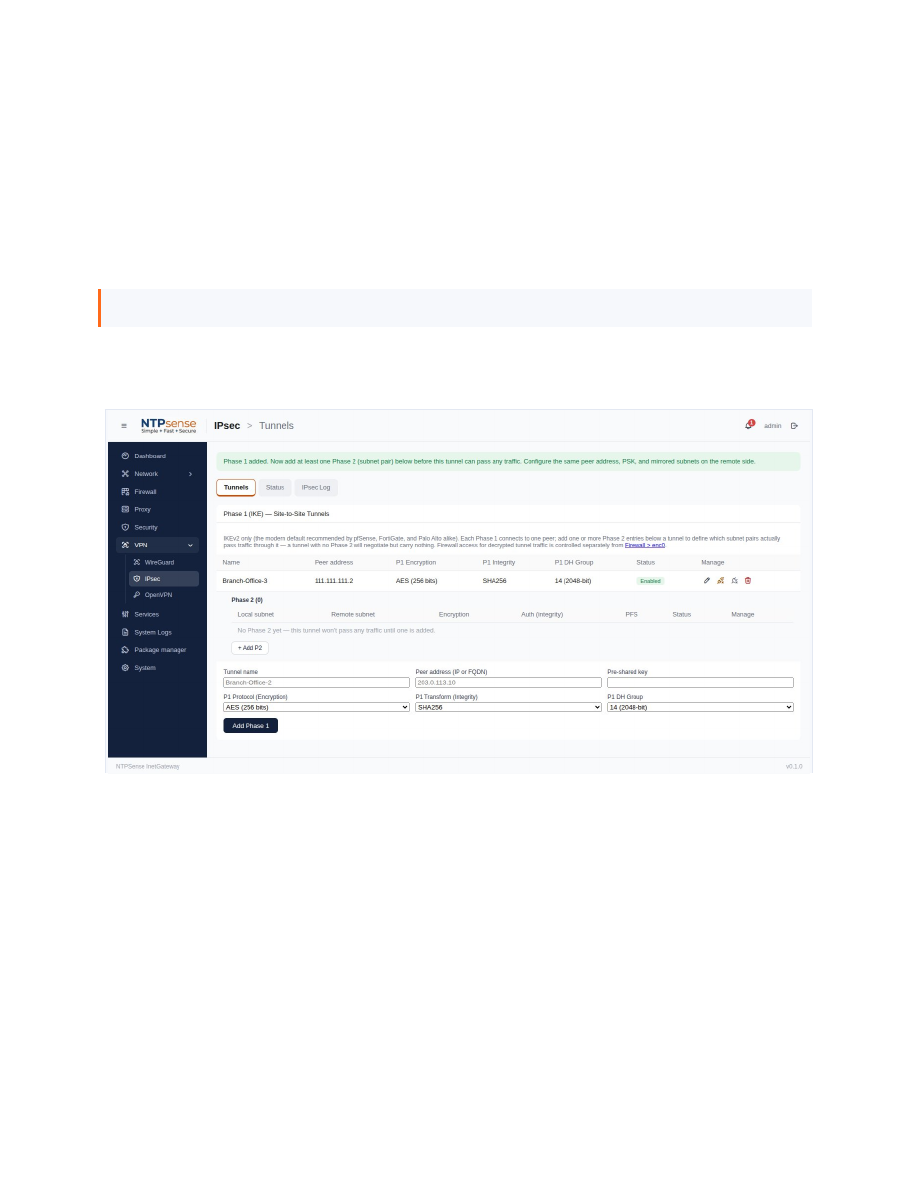
Built in two parts: Phase 1 (connection to the remote peer) and one or more Phase 2 entries (subnet pairs allowed to pass traffic).
- Add Phase 1 — remote peer address and pre-shared key.
- Under it, Add P2 — local and remote subnets.
- Configure the identical peer address, key, and mirrored subnets on the remote side.
Note: IPsec tunnels use "trap" mode by default — they only establish when matching traffic is sent, so "Not established" on an otherwise-correct tunnel just means no recent traffic.
9. System & Console
9.1 Backup and Restore
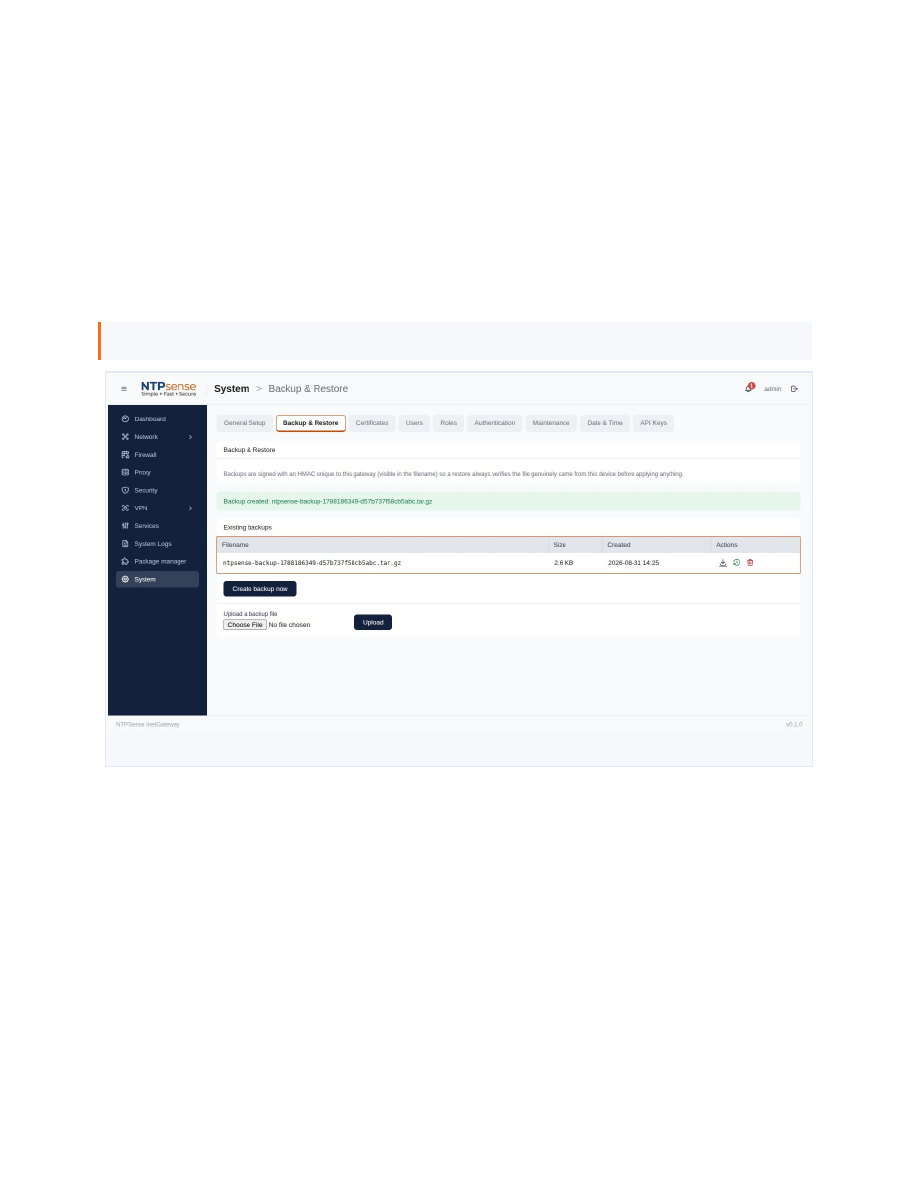
- Go to System > Backup & Restore and click Download Backup.
- Store the file safely — it contains your full configuration, including secrets like VPN keys.
- To restore, upload the same file on this tab.
Note: Backup files are signed (HMAC) so the gateway can detect a corrupted or tampered file before restoring it.
9.2 Package Manager
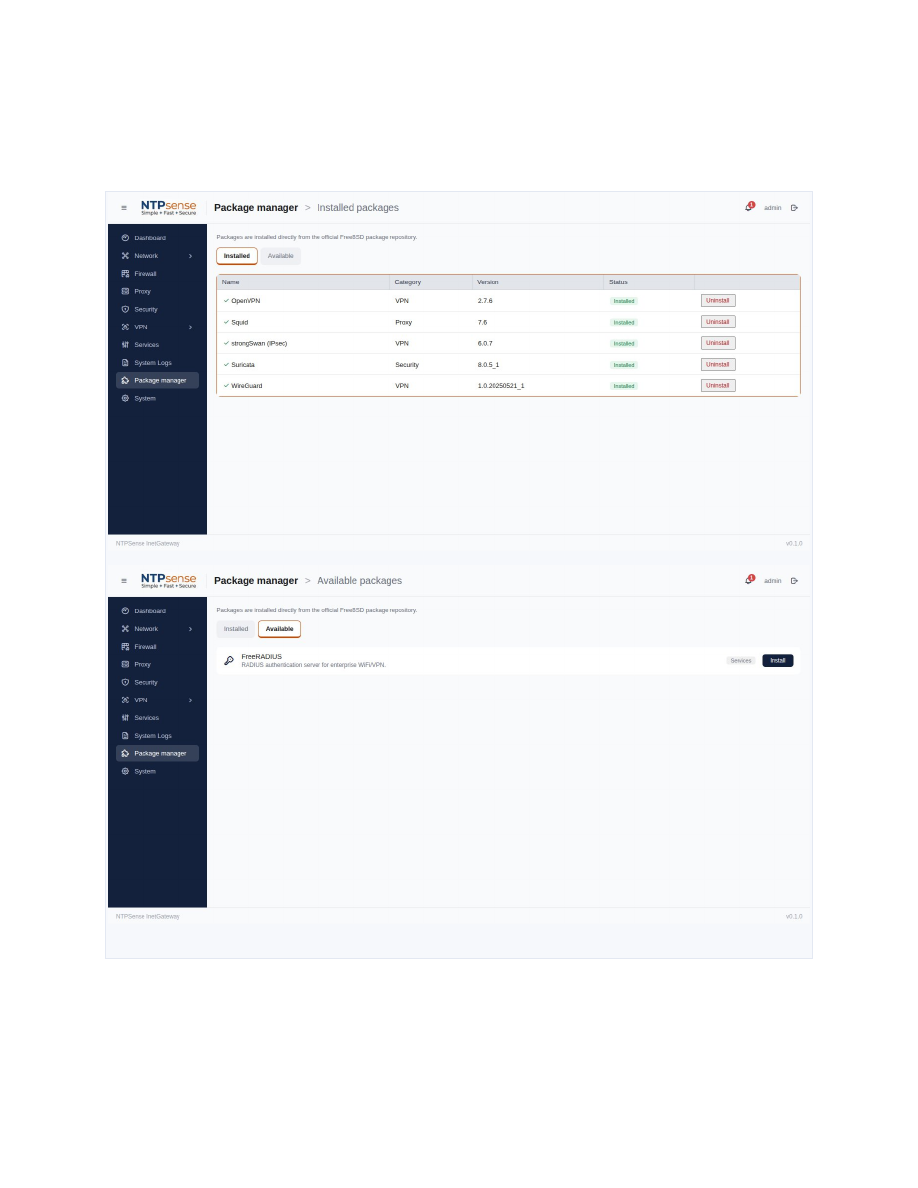
Optional components (Suricata, WireGuard tools, strongSwan, FreeRADIUS, OpenVPN, and others) are installed as standard FreeBSD packages here — no shell access required.
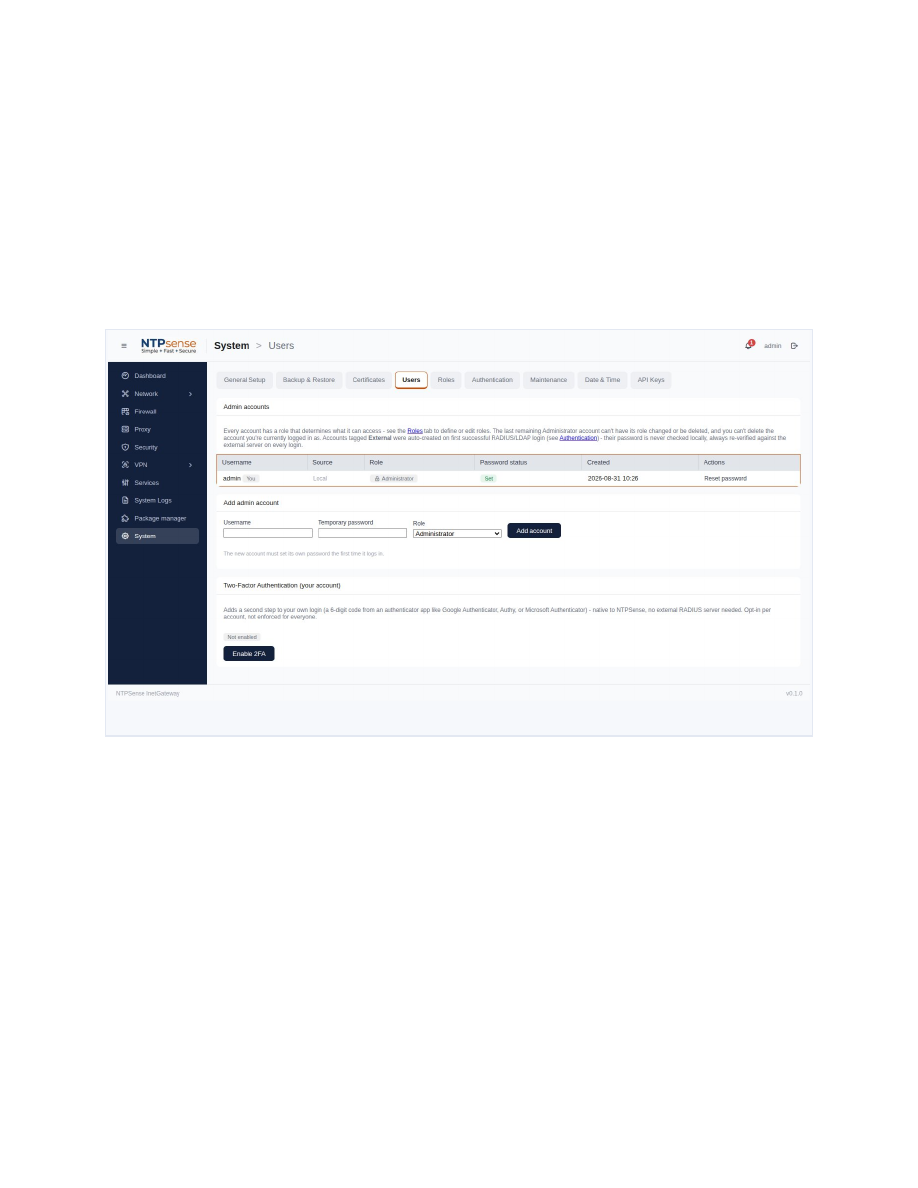
9.3 User Accounts and Roles
- Administrator — full access, including destructive operations.
- Network Operator — day-to-day configuration, no destructive system-level actions.
- Auditor — read-only.
The built-in admin account cannot be deleted or demoted.
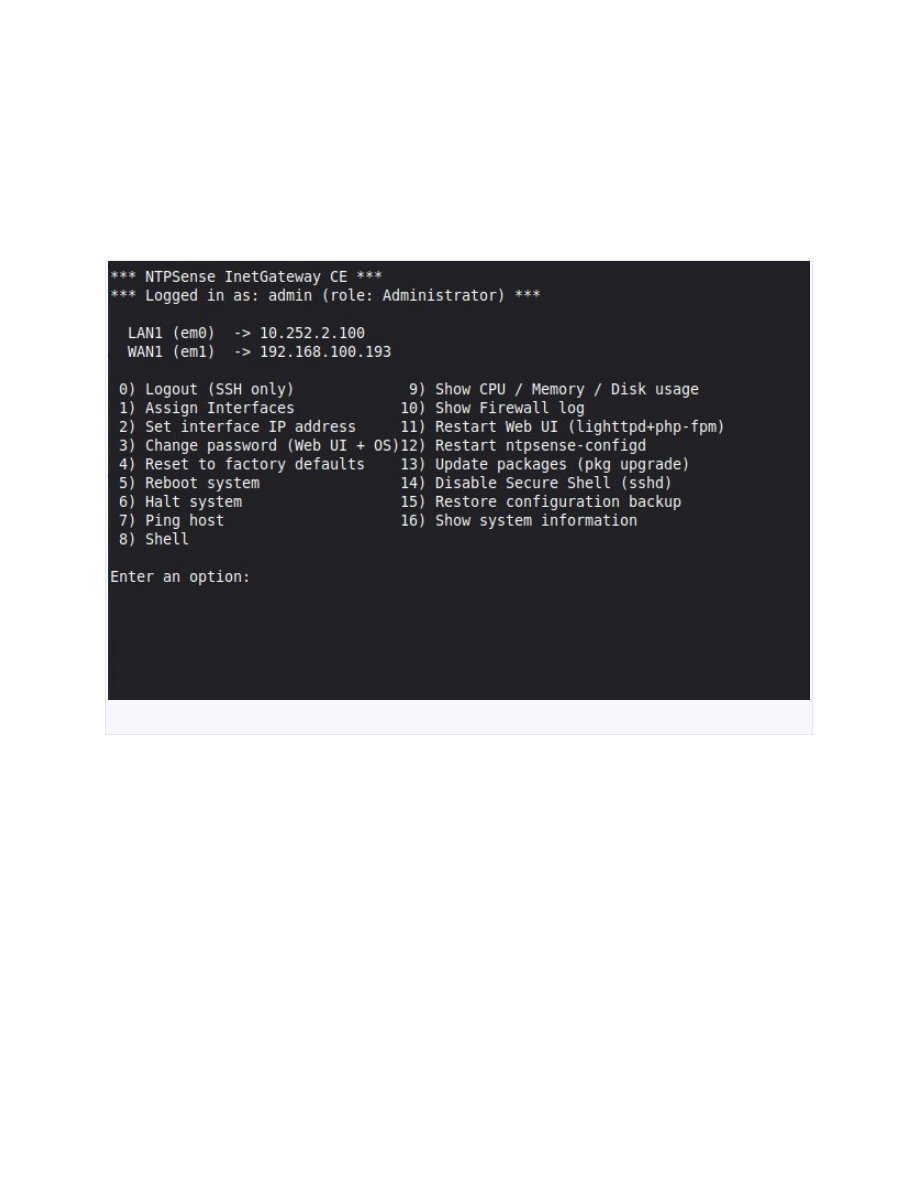
9.4 Console Menu
A full administration menu is available over SSH or a direct console connection, using the same accounts and roles as the Web UI. Option numbers stay consistent regardless of which role is viewing.
10. Troubleshooting & FAQ
10.1 I forgot the admin password
If you still have console access with a working account, use the console menu's Change Password option, which updates both console and Web UI passwords together. If locked out entirely, physical console access is required — there's no remote "forgot password" flow, by design.
10.2 I can't reach the Web UI or console
- Confirm your device is on the LAN side and has received an IP address.
- Confirm the correct address is being used (shown on the console during first boot, and on the Network page's LAN1 entry).
- If a recent firewall change might be responsible, physical console access lets you review and correct rules directly.
10.3 How do I reset to factory defaults?
Factory Reset is available from the console menu (Administrator role required) and wipes all configuration back to installer defaults.
Warning: Factory Reset cannot be undone. Download a backup first if you might want one later (Section 9.1).
10.4 A service shows as stopped
Most services can be restarted directly from their own page or System > Services. If the cause is a configuration error, the relevant page usually surfaces the specific error when you try to save or restart.
10.5 Where can I get more help?
- Documentation: ntpsense.com/support.html
- Source code and issue tracker: github.com/ntpsense/ntpsense-ce
- Commercial support: see NTPSense Pro